1 | BIOS LIMITATIONS
|
2 | ----------------
|
3 | Included here are brief explanations of a number of drive capacity
|
4 | limitations that exist in the computer industry. The use of Disk Manager
|
5 | and its Dynamic Drive Overlay offers a solution to each of these problems.
|
6 |
|
7 | *** 528 MB Limitation ***
|
8 |
|
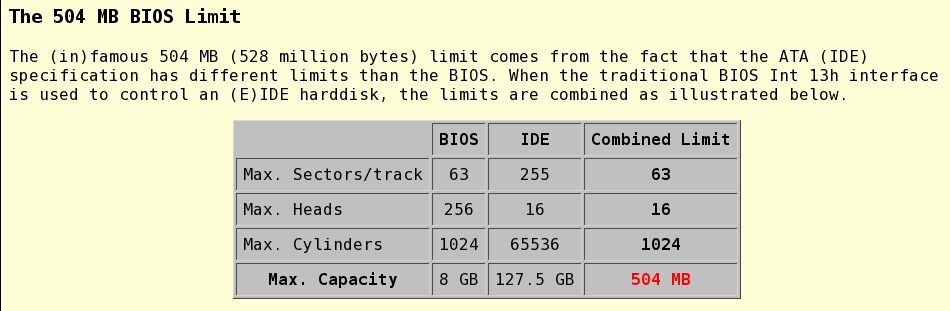
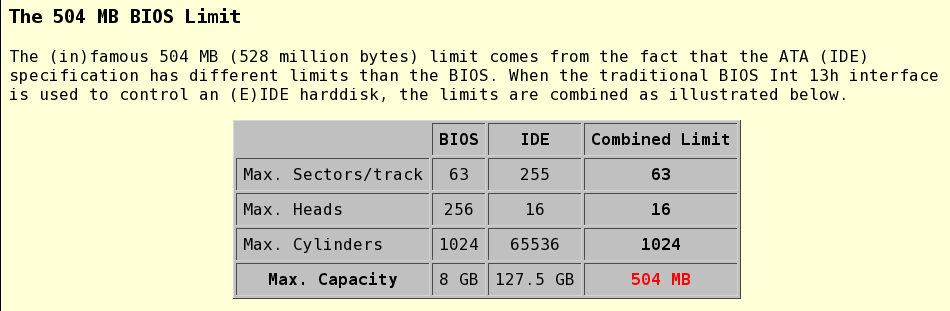
9 | Using the traditional IDE interface limits the system to a maximum drive
|
10 | capacity of 528 MB. The cause of this limitation is Int 13h (BIOS) and
|
11 | IDE field sizes for the CHS (Cylinder, Head, and Sector) entries.
|
12 |
|
13 | Because the system must perform a translation between the CHS parameters
|
14 | recognized by the drive and those established in the Int 13h code,
|
15 | parameters are limited to the smaller of the field sizes allowed for
|
16 | each parameter by the BIOS and the IDE register set. The chart below
|
17 | displays the BIOS, IDE, and limiting field size.
|
18 |
|
19 | BIOS IDE Limit
|
20 | Sectors per Track 63 255 63
|
21 | Number of Heads 255 16 16
|
22 | Number of Cylinders 1024 65536 1024
|
23 | ------ -------- ------
|
24 | Maximum Capacity 8.4 GB 136.9 GB 528 MB
|
25 |
|
26 | The maximum system drive capacity in a combined BIOS/IDE setup is
|
27 | determined by the limiting field size -- 528 MB. Currently, computers
|
28 | are being shipped with a BIOS that implements Extended Int 13h or
|
29 | "Logical Block Addressing" (LBA), both of which are solutions to the
|
30 | 528 MB limitation.
|
31 |
|
32 | *** 4096 Cylinder (2.1 GB) Limitation ***
|
33 |
|
34 | Some computers have a BIOS that does not properly deal with the "13th
|
35 | bit". The 13th bit is needed to provide support for a drive having
|
36 | 4096 or more cylinders. The chart below displays the corresponding
|
37 | cylinder values in decimal, hex, and binary values.
|
38 |
|
39 | DECIMAL HEX BINARY SIZE
|
40 | 1023 = 3FF = 10 bits = 528 MB
|
41 | 2047 = 7FF = 11 bits = 1.0 GB
|
42 | 4095 = FFF = 12 bits = 2.1 GB
|
43 | 8191 = 1FFF = 13 bits = 4.2 GB
|
44 | 16383 = 3FFF = 14 bits = 8.4 GB
|
45 |
|
46 | If you have added a new drive and your system locks up at boot time
|
47 | (right after turning power on) or during System Setup, there may be
|
48 | several causes. Verify that the data cable is properly attached to your
|
49 | drive, pin 1 is correct, and the cable is not installed off a row of pins.
|
50 | If your new drive is larger than 2.1GB and your System Setup (CMOS) is
|
51 | set to "AUTO", you may have a BIOS with a 4096 or greater cylinder
|
52 | limitation. In this case, power off your system, remove your new drive,
|
53 | and follow the instructions that DiskGo! provides. When configuring
|
54 | System Setup (CMOS), DO NOT USE AUTO. Rather, choose one of the
|
55 | following:
|
56 | - USER DEFINABLE set to 1024 cyls 16 hds 63 sects
|
57 | - Drive type 1.
|
58 | Another option is to contact your computer manufacturer to get a BIOS
|
59 | upgrade that will support more than 4096 cylinders.
|
60 |
|
61 | *** 6322 Cylinder (3.27 GB) Limitation ***
|
62 |
|
63 | Some computers have a BIOS that does not properly handle a cylinder value
|
64 | over 6322. If you are in the System Setup attempting to set the cylinder
|
65 | value higher than 6322 (for a 3.27 GB+ drive) and your computer hangs,
|
66 | your computer may have a BIOS with this limitation. To by-pass this
|
67 | limitation, you have two options:
|
68 | - Set the cylinder value to 1024 or less and use Ontrack's Disk
|
69 | Manager to provide support for the whole drive.
|
70 | - Contact your computer manufacturer for a BIOS upgrade, if one is
|
71 | available.
|
72 |
|
73 | *** Invalid BIOS information ***
|
74 |
|
75 | Some computers have a BIOS that may display invalid information in the
|
76 | System Setup (CMOS). This issue may show up in one of two ways:
|
77 | - The System Setup will display the drive parameters and capacity
|
78 | correctly. However, it is not translating the drive correctly.
|
79 | - The System Setup will display invalid drive parameters. However,
|
80 | the BIOS is translating the drive correctly.
|
81 | To ensure your drive is translated to its full capacity, you
|
82 | will need to check the actual drive size. This can be done when creating
|
83 | partitions on the drive.
|
84 |
|
85 | *** 8.4 Gigabyte limit ***
|
86 | If your drive is larger than 8.4 Gigabytes, the capacity may exceed the
|
87 | limits of your system BIOS and operating system. Most system BIOS cannot
|
88 | support ATA drives this large. DOS and Windows operating systems limit the
|
89 | drive capacity to 8.4 Gigabytes per physical drive and 2 Gigabytes per
|
90 | partition.
|
91 | Because of these limitations, a 32-bit file allocation table (FAT32) is
|
92 | required to achieve full capacity of your drive beyond 8.4 Gigabytes.
|
93 | To achieve full capacity of your drive you need a Windows operating system
|
94 | that supports FAT32 and BIOS support for drives greater than 8.4 Gigabytes,
|
95 | from one of the following:
|
96 | Third party device driver, such as Disk Manager (Disk Manager is provided
|
97 | on the DiskGo! diskette included with your drive), or an intelligent ATA
|
98 | host adapter, or a system BIOS upgrade.
|
99 |
|
100 | *************************************************************************
|
101 | *************************************************************************
|
102 |
|
103 | To install your hard disk using Disk Manager, simply follow these
|
104 | basic steps:
|
105 |
|
106 | 1) Following the instructions that DiskGo! provides you,
|
107 | set your System Setup (CMOS), jumper your drive(s), and
|
108 | physically install your hard disk into your computer.
|
109 | Disk Manager assumes power, cables, jumpers, etc.,
|
110 | are connected and properly installed.
|
111 |
|
112 | 2) Insert your DOS diskette in drive A: and boot the machine
|
113 | to DOS.
|
114 |
|
115 | 3) Insert your DiskGo! diskette into drive A: and
|
116 | type DM to invoke Disk Manager.
|
117 |
|
118 | 4) When the installation has completed, remove the DiskGo!
|
119 | diskette from drive A: and boot from the hard disk.
|
120 |
|
121 | See the Disk Manager online manual for more information.
|
122 |
|
123 | Refer to the License Agreement at the beginning of the DiskGo!
|
124 | program.
|
125 |
|
126 | Disk Manager is copyright 1985-1999 by ONTRACK Data International, Inc.
|
127 | Refer to the License Agreement in the Disk Manager online manual.
|