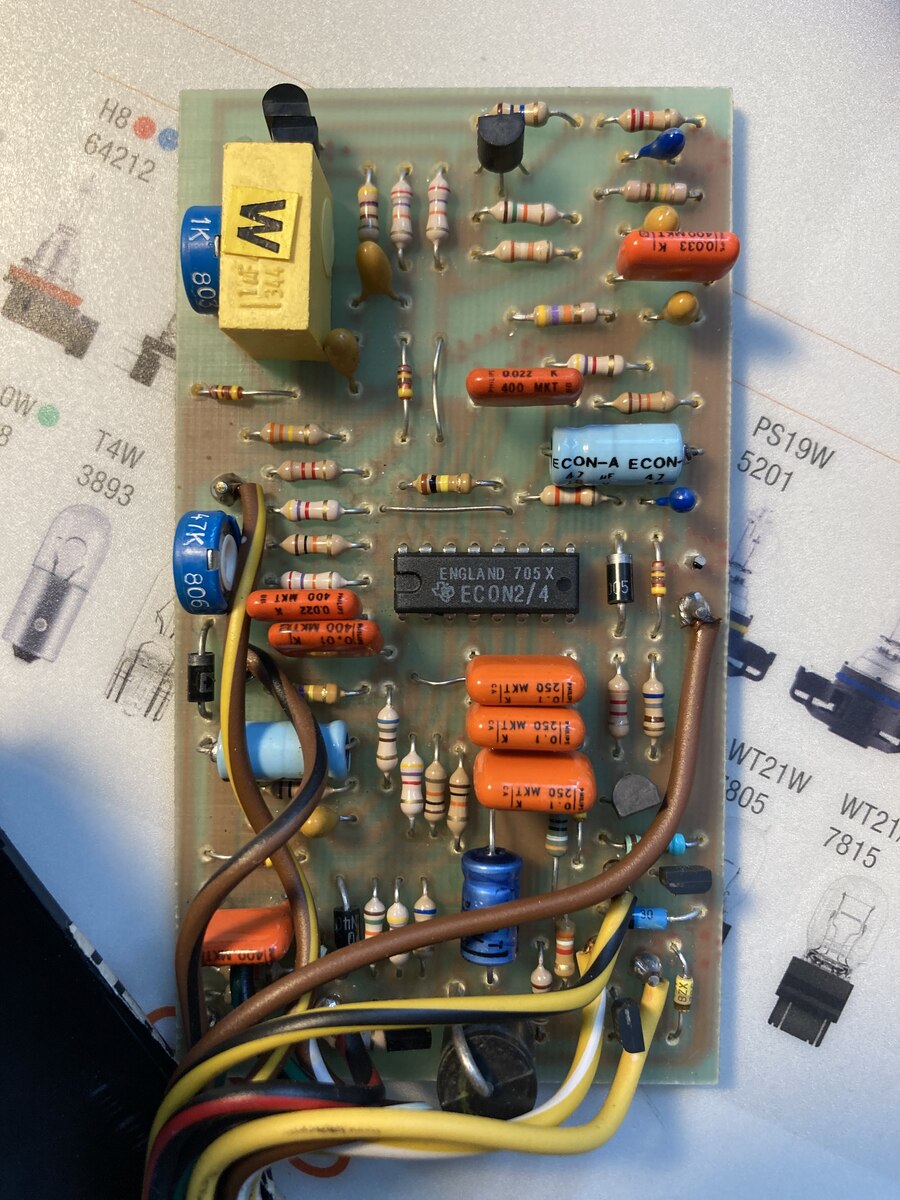
1 | Econocruise Speed Controller
|
2 | INSTALLATION TEST
|
3 | Econocruise Tester Instructions
|
4 | Jaguar Cruise Control
|
5 |
|
6 | 1. Introduction
|
7 |
|
8 | Lamps, (1) to (9), check continuity of all wiring as follows and test switch functions.
|
9 | RESUME, BRAKE-(from pedal action), NEUTRAL (from gear selector). They also indicate
|
10 | the supply and continuity of the system fuse.
|
11 |
|
12 | Lamps, (10) and (11), indicate output from the Electronic Controller under operating
|
13 | conditions with the system engaged. Two associate push buttons allow manual operation
|
14 | of the Throttle Actuator, with lamp indication.
|
15 |
|
16 | 2. CONNECTION DETAILS
|
17 | The Test Unit is connected between the Electronic Controller and the Cruise Control
|
18 | System wiring loom installed in the car.
|
19 |
|
20 | 2a) Disconnect the Electronic Controller connector plugs.
|
21 | 2b) Connect the Test Unit 9 pin plug to the system 9 pin connector.
|
22 | 2c) Connect the speed input two pin connector to the system input connector.
|
23 |
|
24 | 3. STATIC CHECK
|
25 | Set Test Unit switch to STATIC (13).
|
26 | Continuity:
|
27 | 3a) Set gearshift to NEUTRAL or PARK
|
28 | 3b) Switch on ignition (ensure air conditioner etc. is turned off)
|
29 | 3c) Speed Control Master ON/OFF Switch on ON
|
30 | 3d) Check that the following lamps are alight indication correct continuity:-
|
31 | 1 CONTROL valve solenoid and wiring
|
32 | 2 DUMP valve solenoid and wiring
|
33 | 5 BRAKE LIGHTS and wiring
|
34 | 7 BRAKE SUPPLY wiring
|
35 | 8 NEUTRAL OVERRIDE
|
36 | 9 SUPPLY wiring
|
37 |
|
38 | Switch Functions:
|
39 | 3e) The "NEUTRAL OVERRIDE" lamp (8) will light in all positions except Drive ('D' Position).
|
40 | 3f) Press control switch to the SET position. ENGAGE lamp (3) should light.
|
41 | 3g) Press Master ON/OFF Switch to RESUME position. RESUME lamp (4) should light.
|
42 | 3h) Press the brake pedal slowly. First BRAKE LIGHTS lamp (5) should go out and the
|
43 | BRAKE lamp (6) should light.
|
44 | With further depression of the brake pedal the CONTROL lamp (1) and
|
45 | DUMP lamp (2) will go out.
|
46 |
|
47 | NOTE: If both lamps light together check for an open circuit in the wire to the
|
48 | brake lamp side of the brake switch. If the brake lamps and wiring are
|
49 | not continuous the system will not function.
|
50 |
|
51 | The static wiring and switch testing is now complete.
|
52 | *******
|
53 | OVER.....
|
54 | 4. ACTUATOR CHECK (Engine Running)
|
55 | 4a) Test Unit switch (T4) to RUN.
|
56 | 4b) Start engine, select NEUTRAL or PARK with handbrake on.
|
57 | 4c) Depress DUMP button. DUMP lamp (11) should light, indication supply
|
58 | feed to Actuator dump valve.
|
59 | 4d) Hold the DUMP button and simultaneously press the CONTROL button. CONTROL
|
60 | lamp (10) should light and the engine speed should increase as the Actuator
|
61 | opens the throttle. If not, check Actuator vacuum hose and throttle cable
|
62 | connections.
|
63 | CAUTION: This operation causes engine rev's to build up rapidly, be sure to
|
64 | release buttons quickly when operation is established.
|
65 |
|
66 | 4e) Release the DUMP button.
|
67 | 4f) Switch off engine. The Actuator is functioning correctly.
|
68 |
|
69 | 5. DRIVING CHECK (Tester Connected)
|
70 | Speed Input:
|
71 | 5a) Start the vehicle and drive slowly. INPUT lamp (12) should flicker at slow
|
72 | speeds indicating the presence of a speed input signal from the transducer
|
73 | and driveshaft magnets. This will occur whilst the vehicle is moving.
|
74 |
|
75 | Electronic Controller:
|
76 | 5b) Drive to about 50mph on a quiet, flat road. Press system SET switch until the
|
77 | throttle pedal is felt to move. Release the switch and remove foot from throttle
|
78 | pedal. DUMP lamp (11) should light.
|
79 | 5c) The vehicle should cruise at ± 1 mph of the speed selected. If not, remove the
|
80 | rubber grommet from the side of the Controller and adjust the set speed
|
81 | potentiometer with a small screwdriver. Clockwise to increase. Counter-clockwise
|
82 | to decrease the cruise speed.
|
83 | Pressing the SET switch quickly several times should have very little effect on
|
84 | the cruise speed, if the adjustment has been carried out correctly.
|
85 | 5d) CONTROL lamp (10) should be flickering. Travelling uphill the lamp should
|
86 | become brighter, and downhill should become dimmer.
|
87 | 5e) Brake car to about 10 mph below the cruise speed. Both DUMP and CONTROL lamps
|
88 | should go out as brake is applied.
|
89 | 5f) Press system Master ON/OFF switch momentarily to RESUME position. DUMP and
|
90 | CONTROL lamps should come fully one, and the car should accelerate back to
|
91 | original cruise speed.
|
92 | Just before this speed is reached the CONTROL lamp will again begin to flicker
|
93 | as the system resumes control of the vehicle speed.
|
94 | 5g) Press the brake pedal and allow the car to slow down to about 15 mph. Accelerate
|
95 | slowly, using the throttle pedal whilst pressing Master ON/OFF switch momentarily
|
96 | to RESUME position at about 1 mph intervals. As the Low Speed Lock Out point is
|
97 | reached (about 22 mph) the DUMP and CONTROL lamps should come fully on, and the
|
98 | car should accelerate back to the original cruise speed.
|
99 | 5h) Move gear selector out of Drive. DUMP and CONTROL lamps should go out.
|
100 | 5i) Re-engage Drive and press RESUME. DUMP and CONTROL lamps should come on, and
|
101 | the car return to control speed.
|
102 |
|
103 | After completion of test, remove Tester from vehicle and re-connect
|
104 | Electronic Controller to system connectors.
|
105 |
|
106 | HCT APRIL 1982
|
107 |
|
108 |
|
109 | (1) CONTROL yellow/black
|
110 | (2) DUMP yellow/white
|
111 | (3) ENGAGE black/pink
|
112 | (4) RESUME black/white
|
113 | (5) BRAKE LIGHTS green/violet green/purple
|
114 | (6) BRAKE 2nd safety
|
115 | (7) BRAKE SUPPLY yellow/orange?
|
116 | (8) NEUTRAL OVERRIDE yellow/violet
|
117 | (9) SUPPLY yellow/orange?
|
118 | 10) CONTROL
|
119 | 11) DUMP
|
120 | 12) INPUT yellow
|
121 | 13) STATIC
|
122 | 14) RUN
|
123 |
|
124 | unknown colors: brown/yellow, brown/black, brown (Gnd), black/red
|
125 |
|
126 | Hersteller ist Econoncruise Ltd. 180 Wood Street, Rugby CV21 2NP England
|
127 | Telephone: (0788) 74431 Telex: 31 1331
|
128 | An dieser Adresse sind jetzt Autowerkstätten, die Vorwahl ist nun 01788, die Ortskennung CV21 2YX.
|
129 | WOOD STREET TYRES & AUTOCENTRE
|
130 | RK Car Design
|
131 | M&J+Motor-Vation
|
132 |
|
133 | Aktuelle Adresse 1994:
|
134 | Butlers Leap; Rugby; Warwickshire; CV21 3RQ.
|
135 | tel. (0788) 54 63 33 telefax (0788) 56 92 83 Employees: 90 Man. Dir.
|

 IMG_1916.jpg
(240 KB)
IMG_1916.jpg
(240 KB)
 6848433A-44C9-43E6-AAAF-C3F94270E37C.JPG
(220 KB)
6848433A-44C9-43E6-AAAF-C3F94270E37C.JPG
(220 KB)
 03AD9AE7-9852-4D15-8F1F-B6E5C646CF0D.JPG
(230 KB)
03AD9AE7-9852-4D15-8F1F-B6E5C646CF0D.JPG
(230 KB)
 6DA0F062-273A-4C3E-AA73-CE13D47F2185.JPG
(240 KB)
6DA0F062-273A-4C3E-AA73-CE13D47F2185.JPG
(240 KB)