-
 Bild
Bild
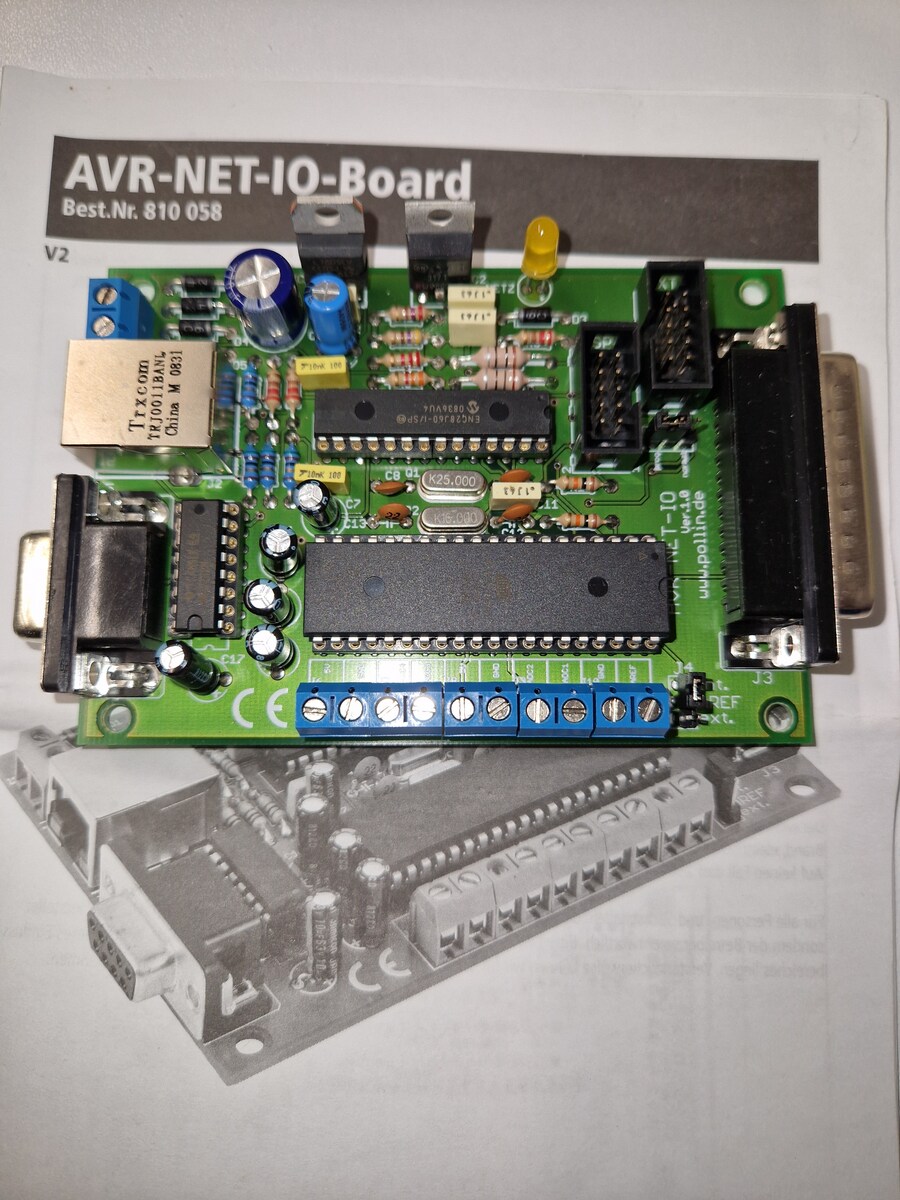
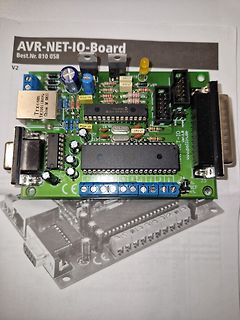
AVR-NET-IO-Board Leiterplatte auf Dokumentation
AVR-NET-IO-Board Best.Nr. 810 058 V2 TR10911BANT China M 0831 K25.000 AVR-NET-IO www.pollinde.de
in „AVR Net-IO Pollin Bausatz zusammen gebaut“ · Markt · · Platinenfotos
-
 Bild
Bild
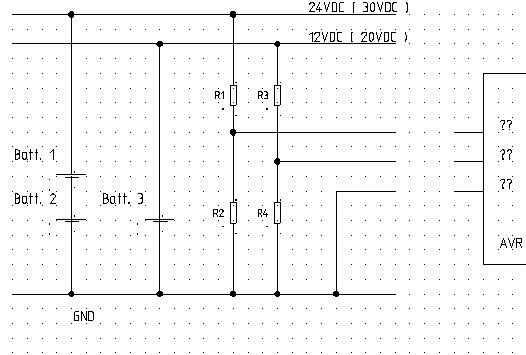
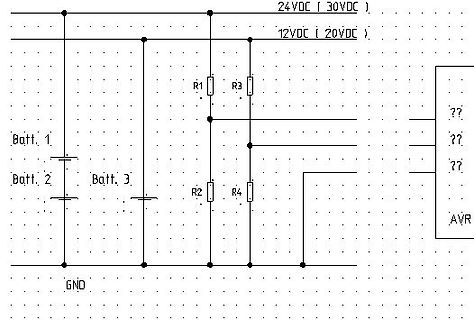
Schaltplan mit Batterien und Widerständen
24VDC (30VDC) 12VDC (20VDC) Batt. 1 Batt. 2 Batt. 3 R1 R2 R3 R4 GND AVR
in „Mit AVR NET IO Batterien messen“ · Mikrocontroller und Digitale Elektronik · · Schaltpläne
-
 Bild
Bild
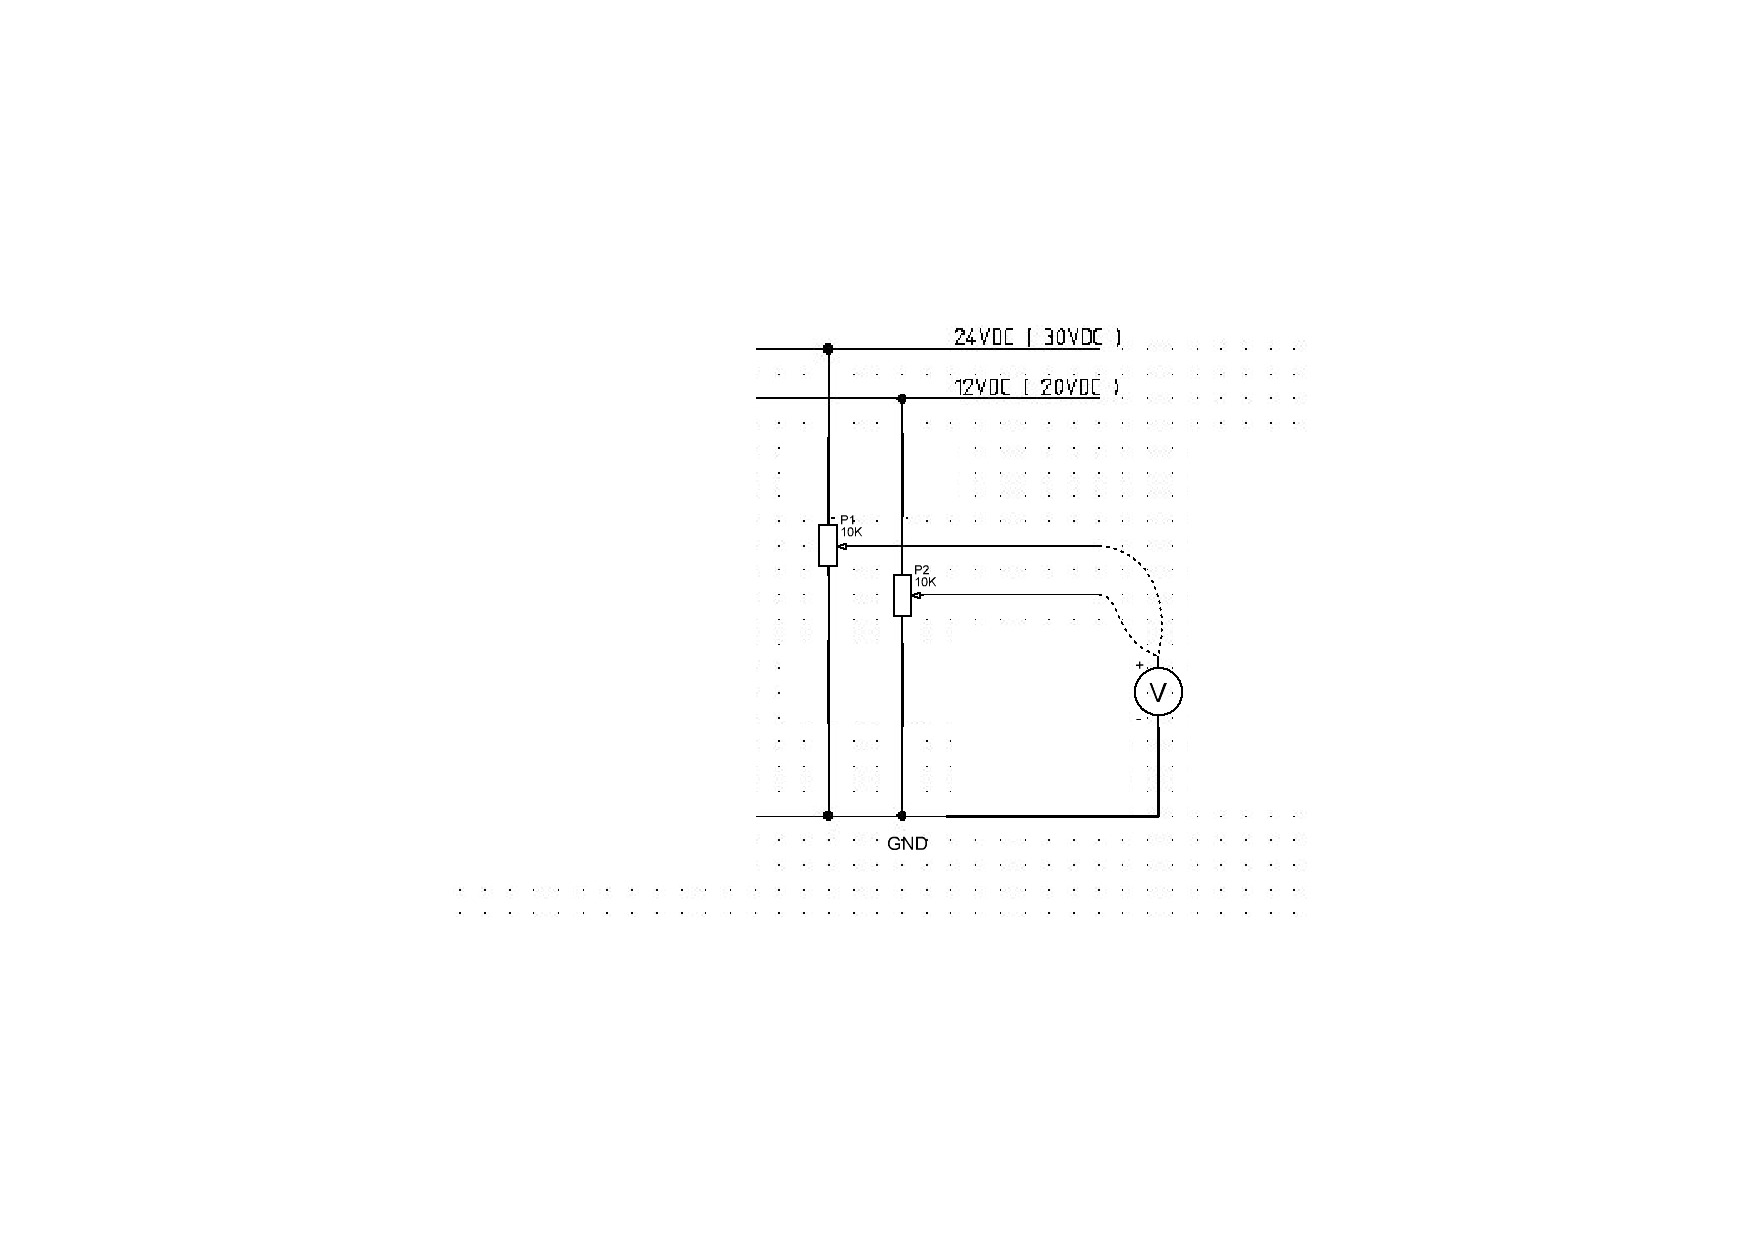
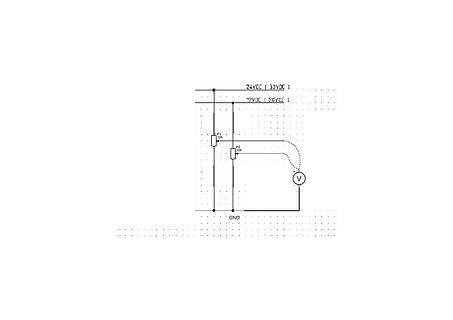
Schaltplan eines Spannungsteilers
24VDC (30VDC) 12VDC (20VDC) P1 10k P2 10k V GND
in „Mit AVR NET IO Batterien messen“ · Mikrocontroller und Digitale Elektronik · · Schaltpläne
-
Datei
avrdude-5.6_avr-net-io.patch
--- butterfly.c.orig 2008-06-07 23:03:41.000000000 +0200 +++ butterfly.c 2009-03-11 23:19:39.000000000 +0100 @@ -110,8 +110,8 @@ butterfly_recv(pgm, &c, 1); if (c != '\r') { - fprintf(stderr, "%s: error: programmer did not respond to command: %s\n", - progname, errmsg); + fprintf(stderr, "%s: error: programmer did not respond to command: %s (%x)\n", + progname, errmsg, c); exit(1); } } @@ -268,8 +268,13 @@ /* See if programmer supports autoincrement of address. */ - butterfly_send(pgm, "a", 1); - butterfly_recv(pgm, &PDATA(pgm)->has_auto_incr_addr, 1); + if (strcmp(id,"NET-I/O") == 0) { + // AVR-NET-I
in „AVR für wenig Geld im LAN“ · Mikrocontroller und Digitale Elektronik ·
-
PDF
Arbeit.pdf
hier den avr-net-io, der ein oben genanntes System kontrollieren und durch die Vernetzung mit dem Hausnetzwerk Daten verarbeiten soll. Der avr-net-io kann durch seinen Netzwerkanschluss bequem direkt mit einem Patchkabel
-
Datei
configx.h
\src\net_URadig\ntpc.h" #include "C:\lpcexpresso_netio\netIO_V0\src\net_URadig\telnetd.h" #include "C:\lpcexpresso_netio\netIO_V0\src\net_URadig\telnetdc.h" #include "C:\lpcexpresso_netio\netIO_V0\src\net_URadig\dnsc.h" #include "C:\lpcexpresso_netio\netIO_V0\src\net_URadig\dnscc.h" #include "C:\lpcexpresso_netio\netIO_V0\src\net_URadig\kkstring.h" #include "C:\lpcexpresso_netio\netIO_V0\src\net_URadig\translate.h" #include "C:\lpcexpresso_netio\netIO_V0
in „Header Datei für Konfiguration erstellen“ · Mikrocontroller und Digitale Elektronik ·
-
PDF
AVR_ASM_Tutorial.pdf
AVR-Tutorial - 1. Benötigte Ausrüstung - www.mikrocontroller.net www.mikrocontroller.net Home AVR-Tutorial - 1. Benötigte Ausrüstung AVR-Tutorial ● 1. Ausrüstung 1. Hardware ● 2. IO-Grundlagen ● 3. Stack
in „ASM Tutorial jetzt als PDF“ · Mikrocontroller und Digitale Elektronik ·
-
PDF
AVR-C-Tutorial.pdf
zugreifen. Die spezielle Funktion inp() ist nicht mehr notwendig und veraltet. Beispiel: #include <avr/io.h> uint8_t foo; ... int main(void) { Variable foo */; /* kopiert den Status der Eingabepins an PortB in die ... } Seite 15 von 80 übernommen aus: http://www.mikrocontroller.net/wiki/AVR-GCC-Tutorial
in „AVR-C-Tutorial“ · Mikrocontroller und Digitale Elektronik ·
-
Datei
upload.php
\n" "Sonne_Akt=%VA@05\r\n" */ function getAVRNetIOValue($id) { $value = NULL; error_reporting(0); $avr_net_io = fopen("http://meine_URL_zum_NETIO", "r") or die("Die Werte des AVR-NET-IO konnten nicht ermittelt werden!<BR>Der AVR-NET-IO ist offline!"); if ($avr_net_io!=false) { while ( ($data = fgetcsv($avr_net_io, 1000, "=")) !== FALSE ) { $num = count($data); $row++; if ($data[0] == $id) { $value = $data[1]; } } fclose($avr_net_io); } return $value; } /* AVR Werte auslsen */ $Temp_aussen_Akt = getAVRNetIOValue
in „AVR Net IO Daten direkt in MYSQL hochladen“ · Mikrocontroller und Digitale Elektronik ·
-
Datei
update_ge_ndert.php
Auslesen der Daten aus einer Webpage function getAVRNetIOValue($id) { $value = NULL; error_reporting(0); $avr_net_io = fopen("http://xxx.xxx.xxx.xxx/daten.html", "r") or die("Die Werte des AVR-NET-IO konnten nicht ermittelt werden!<BR>Der AVR-NET-IO ist offline!"); //Hier IP des Boards eintragen if ($avr_net_io!=false) { while ( ($data = fgetcsv($avr_net_io, 1000, "=")) !== FALSE ) { $num = count($data); $row++; if ($data[0] == $id) { $value = $data[1]; } } fclose($avr_net_io); } return $value; } // Analoge Werte $Wohnzimmer Temperatur = getAVRNetIOValue
-
Datei
AVRDude.txt
specify the -D option. avrdude: erasing chip avrdude: reading input file "/home/tux/Gemeinsamer_Ordner/AVR_NET_IO/bootloader.hex" avrdude: input file /home/tux/Gemeinsamer_Ordner/AVR_NET_IO/bootloader.hex auto detected as Intel Hex avrdude: writing flash (31632 bytes): Writing | #########################
in „AVR Net IO - Problem mit Firmware laden, Absturz“ · Mikrocontroller und Digitale Elektronik ·
-
Datei
update.php
Auslesen der Daten aus einer Webpage function getAVRNetIOValue($id) { $value = NULL; error_reporting(0); $avr_net_io = fopen("http://xxx.xxx.xxx.xxx/daten.html", "r") or die("Die Werte des AVR-NET-IO konnten nicht ermittelt werden!<BR>Der AVR-NET-IO ist offline!"); if ($avr_net_io!=false) { while ( ($data = fgetcsv($avr_net_io, 1000, "=")) !== FALSE ) { $num = count($data); $row++; if ($data[0] == $id) { $value = $data[1]; } } fclose($avr_net_io); } return $value; } // Analoge Werte $CO2 = getAVRNetIOValue("CO2");
-
Datei
Robue.diff
diff -ruN AVR-NET-IO_RoBue_Entw/Sourcen(alle)/analog.c RoBue_1.5/analog.c --- AVR-NET-IO_RoBue_Entw/Sourcen(alle)/analog.c Wed Feb 18 00:47:50 2009 +++ RoBue_1.5/analog.c Sun Mar 1 12:34:53 2009 @@ -46,7 +46,13 @
in „AVR für wenig Geld im LAN“ · Mikrocontroller und Digitale Elektronik ·
-
PDF
simulavr.pdf
GUI. Until this button pressed, any updates are ignored. Chapter 5: Graphic User Interface 9 5.1.2 Net Commonly spoken a Net connects a digital IO-pin of the simulated CPU with another pin like a copper wire. In the context of the GUI a Net provides the possibility to enter a value for an input pin and
-
Datei
graphical_avrnetio.py
python #-*- coding:utf8 -*- #======================================================= # Connecting to AVR NET-IO with python # with a graphical user interface #======================================================= # Funktionen: #+ Grafische Benutzerschnittstelle für AVR NET-IO "out of the box" #+ Auslesen
in „AVR NET-IO - Zugriff und Loggen mit Python, mit grafischer Benutzeroberfläche“ · Projekte & Code ·
-
PDF
avr_memory_contents_after_sleep_and_reset.pdf
EMORY , SRAM, R EGISTERS , SLEEP, R ESET #006 This document is originally distrubuted by AVRfreaks.net, and may be distributed, reproduced, and modified without restrictions. Updates and additional design notes can be found at: www.avrfreaks.net AVR Memory Contents After Sleep and Reset Introduction The AVR contains volatile memories like SRAM, IO Registers and the Register File with 32 general purpose registers. What happens to the contents in these volatile memories during a Power-up Reset, an External
in „"Standard" Initialisierung von Registern“ · Mikrocontroller und Digitale Elektronik ·
-
PDF
AVR-Tutorial.pdf
AVR-Tutorial Aus „www.mikrocontroller.net“ Der Inhalt entspricht dem Stand vom 15.10.2006. Es erfolgte eine leichte Umformatierung zur besseren Druckbarkeit. Keine Gewährleistung irgendwelcher Art! AVR-TUTORIAL
in „AVR-Tutorial als PDF bzw *.doc“ · Mikrocontroller und Digitale Elektronik ·
-
Datei
Buffer.c
//Buffer CNC_Fraese <> //Copyright RyBa Solutions GmbH //Authors: LR,RB #include <avr/io.h> #include <avr/interrupt.h> #include <util/delay.h> #include <stdlib.h> #include <stdbool.h> #ifndef Buffer_h //Anstatt Header Datei! #define Buffer_h //Function prototypes: void inter_init (void
in „Interrupt Fehlerquellen - FIFO Buffer“ · Mikrocontroller und Digitale Elektronik ·
-
Datei
ports_.h
time to being it back to 0x12 - which is the right value to use in IN/OUT instructions ( because the IO space is offset by 32 as the 0x00..0x1F region is occupied by the R0..R31 registers of the AVR) toolchain/avr/include/iom328p.h ******************************* #define PINB _SFR_IO8(0x03) #define DDRB
in „Wie ist PORTB implementiert?“ · Mikrocontroller und Digitale Elektronik ·
-
Datei
ports_.h
time to being it back to 0x12 - which is the right value to use in IN/OUT instructions ( because the IO space is offset by 32 as the 0x00..0x1F region is occupied by the R0..R31 registers of the AVR) toolchain/avr/include/iom328p.h ******************************* #define PINB _SFR_IO8(0x03) #define DDRB
-
PDF
GCC_Tut_Test.pdf
Hardware UART bzw. USART verfug n. Die Namen der Register sind in den Headerdateien zu den entsprechenden AVR-Typen de▯niert. Dazu muss man den Namen der controllerspezi▯schen Headerdatei nicht kennen. Es reicht aus, die allgemeine Headerdatei avr/io.h einzubinden: ▯ ▯ 1 #include <avr/io.h> ▯ ▯ Ist im Make▯
-
Datei
specs-atmega4808.txt
of __AVR_ATmega8A__ and avr/io.h includes the device # header 'iom8a.h' by means of: # # ... # #elif defined (__AVR_ATmega8A__) # # include <avr/iom8a.h> # #elif ... # # If no device macro is defined, AVR-LibC uses __AVR_DEV_LIB_NAME__ # as fallback to determine the name of the device header as # # "avr/io" + __AVR_DEV_LIB_NAME__ + ".h" # # If you provide your own specs file for a device not yet known to # AVR-LibC,
in „cannot read spec file 'device-specs/specs-atmega4808'“ · Mikrocontroller und Digitale Elektronik ·
-
Datei
LcdTest_.cpp
***** // Mcucpp: https://github.com/KonstantinChizhov/Mcucpp // valout: http://www.mikrocontroller.net/topic/121526#new (Peter Dannegger ) // valout_ https://www.mikrocontroller.net/topic/231721#new (Uwe S|12-09-2011) //---------------------------------------------------------------------------- // http
in „Welchen Controller für C++ Programmierung?“ · Mikrocontroller und Digitale Elektronik ·
-
Datei
Quellcode_LCD.txt
ATMega8 => MCU=atmega8 im makefile einstellen // lcd-routines.c in SRC = ... Zeile anhängen // #include <avr/io.h> #include "lcd-routines.h" int main(void) { lcd_init(); set_cursor(0,1); lcd_string("Hello World!"); while(1) { } return 0; } Datei lcr-routines.c: // Ansteuerung eines HD44780 kompatiblen LCD im 4-Bit-Interfacemodus // http://www.mikrocontroller.net/articles/AVR-GCC-Tutorial // // Die Pinbelegung ist über defines in lcd-routines.h einstellbar #include <avr/io.h> #include "lcd-routines.h" #include <util/delay.h> // sendet ein Datenbyte an das LCD
in „HD44780 LCD - Keine Anzeige“ · Mikrocontroller und Digitale Elektronik ·
-
Datei
FirststepAtmega64.txt
LCD_DDR DDRC #define LCD_RS PC4 #define LCD_EN PC5 // DB4 bis DB7 des LCD sind mit PC0 bis PC3 des AVR verbunden // Ansteuerung eines HD44780 kompatiblen LCD im 4-Bit-Interfacemodus // http://www.mikrocontroller.net/articles/AVR-GCC-Tutorial // // Die Pinbelegung ist über defines in lcd-routines.h einstellbar #include <avr/io.h> #include <string.h> #include "lcd-routines.h" #include <util/delay.h> // sendet ein Datenbyte an das LCD void lcd_data(unsigned char temp1) { unsigned char temp2 = temp1; LCD_PORT |= (1<<LCD_RS
in „LCD Blau am Atmega 64“ · Mikrocontroller und Digitale Elektronik ·
-
Datei
SheevaPlug.cpp
AtmelStudio 6.2: ****************************************************************************** * AVR/GNU C++ Compiler ************************************************* * Version : avr-gcc-8.0_2017-07-19_mingw32 ****************************************************************************** * Device
in „AVR GPIOR Bit Verwaltung C++“ · Mikrocontroller und Digitale Elektronik ·
-
Datei
ausgabe.txt
0xfff03400 cpufreq: AT32AP CPU frequency driver dmac0: DesignWare DMA controller at 0xff200000 irq 2 Time: avr32 clocksource has been installed. NET: Registered protocol family 2 IP route cache hash table entries: 1024 (order: 0, 4096 bytes) TCP established hash table entries: 2048 (order: 2, 16384 bytes) TCP
in „grasshopper Atmel buildroot 2.3.0 kompilieren avr32.ext2 make error 1“ · Mikrocontroller und Digitale Elektronik ·
-
Datei
bootlog.txt
Controller at 0xfff00100, IRQ 19 at32_eic at32_eic.0: Handling 4 external IRQs, starting with IRQ 64 AVR32 AP Power Management enabled dmac0: DesignWare DMA controller at 0xff200000 irq 2 NET: Registered protocol family 2 IP route cache hash table entries: 1024 (order: 0, 4096 bytes) TCP established hash
in „STK1000 und JTAGICE MKII - Verbindung“ · Mikrocontroller und Digitale Elektronik ·
-
Datei
controller.c
========= #include <stdio.h> #include <string.h> #include <stdint.h> #include <stdlib.h> #include <avr/wdt.h> #include <avr/interrupt.h> #include <avr/io.h> #include <avr/eeprom.h> #include <util/delay.h> #include <avr/pgmspace.h> #include "gaul.h" #include "controller.h" // -------------------------
in „Mega32: Program hängt.“ · Mikrocontroller und Digitale Elektronik ·
-
Datei
controller.c
========= #include <stdio.h> #include <string.h> #include <stdint.h> #include <stdlib.h> #include <avr/wdt.h> #include <avr/interrupt.h> #include <avr/io.h> #include <avr/eeprom.h> #include <util/delay.h> #include <avr/pgmspace.h> #include <util/atomic.h> #include "gaul.h" #include "controller.h" //
in „ATMega644p: Kein Reset nach Programmiervorgang“ · Mikrocontroller und Digitale Elektronik ·
-
Datei
grashopper.txt
delay using timer specific routine.. 280.63 BogoMIPS (lpj=561269) Mount-cache hash table entries: 512 net_namespace: 156 bytes NET: Registered protocol family 16 ICNova: 9 Leds pdc pdc.0: Atmel Peripheral DMA Controller enabled at32_eic at32_eic.0: External Interrupt Controller at 0xfff00100, IRQ 19 at32
in „grasshopper init.d zerschossen“ · Mikrocontroller und Digitale Elektronik ·
-
Datei
LCD_Display_Test.txt
// Ansteuerung eines HD44780 kompatiblen LCD im 4-Bit-Interfacemodus // http://www.mikrocontroller.net/articles/AVR-GCC-Tutorial/LCD-Ansteuerung // #ifndef F_CPU #define F_CPU 3686400 #endif #include <avr/io.h> #include <util/delay.h> #ifndef LCD_ROUTINES_H #define LCD_ROUTINES_H ////////////////////
in „Problem mit der Steuerung eines LCD-Displays“ · Mikrocontroller und Digitale Elektronik ·
-
Datei
LCD_Display_Test.c
// Ansteuerung eines HD44780 kompatiblen LCD im 4-Bit-Interfacemodus // http://www.mikrocontroller.net/articles/AVR-GCC-Tutorial/LCD-Ansteuerung // #ifndef F_CPU #define F_CPU 3686400 #endif #include <avr/io.h> #include <util/delay.h> #ifndef LCD_ROUTINES_H #define LCD_ROUTINES_H ////////////////////
in „Problem mit der Steuerung eines LCD-Displays“ · Mikrocontroller und Digitale Elektronik ·
-
PDF
avrasm.pdf
Beispiel-Schaltungen und weiterführende Texte und Beispiele wird das Tutorial auf ----- http://www.mikrocontroller.net und das Tutorial auhttp://www.avr-asm-tutorial.net empfohlen. 255 1. Zahlen: OK, das wußten wir schon, aber wie ist das mit dem Byte und den lauter Einsen ? ---------- Antwort: Das ist genauso, aber
-
Datei
small_printf.c
Version von printf zur urspruenglichen Verwendung im ATtiny23 (sollte allerdings auch mit allen anderen AVR- Controllern funktionieren) 22.04.2016 R. Seelig Danke an www.mikrocontroller.net (Dr.Sommer, beric) Platzhalterfunktionen von tiny_printf -----------------------------------------------------------
in „#define Ich bekomme ein Makro nicht hin.“ · Mikrocontroller und Digitale Elektronik ·
-
Datei
mmc.c
includes a few functions that were originally made for a ti msp340. // i found it on www.mikrocontroller.net once upon a time // the ripped functions are // MMC_get_R1 // MMC_get_R2 // the cs_deselect; spi_io(0xff); CS_select; in the while loop in MMC_init doesn't work without // unfortunatley i lost the link. // if you know where this code can be found, let me know so i can put a link here. #include <avr/io.h> #include <avr/interrupt.h> #include "types.h" #include "delay.h" #include "spi.h" #include "mmc.h" #include "fat16.h" #define MMC_CS_DDR DDRB #define MMC_CS_PIN PINB #define MMC_CS_PORT PORTB
in „[atmega8] UART-Daten auf SD-Karte schreiben“ · Mikrocontroller und Digitale Elektronik ·
-
PDF
avr-libc-user-manual-1.8.0.pdf
AVR CPU functions 235 < avr/eeprom.> : EEPROM handling 236 < avr/fuse>h: Fuse Support 240 < avr/interrup>.: Interrupts 244 < avr/io>h: AVR device-specific IO definitions 265 < avr/lock>h: Lockbit Support
in „Interrupt Probleme beim Arduino“ · Mikrocontroller und Digitale Elektronik ·
-
Datei
mmc.c
includes a few functions that were originally made for a ti msp340. // i found it on www.mikrocontroller.net once upon a time // the ripped functions are // MMC_get_R1 // MMC_get_R2 // the cs_deselect; spi_io(0xff); CS_select; in the while loop in MMC_init doesn't work without // unfortunatley i lost the link. // if you know where this code can be found, let me know so i can put a link here. #include <avr/io.h> #include <avr/signal.h> #include <avr/interrupt.h> #include "types.h" #include "delay.h" #include "spi.h" #include "mmc.h" //test #include "config.h" #ifndef PLAY_LED_ON #define PLAY_LED_ON cbi
in „SD Karte initialisieren“ · Mikrocontroller und Digitale Elektronik ·
-
 Bild
Bild
Screenshot der Webseite mikrocontroller.net
mikrocontroller.net Neuigkeiten Artikel Forum Suche Willkommen im Mikrocontroller.net Artikelsammlung. Alle Artikel hier können nach dem Wiki-Prinzip von etwas bearbeitet werden. Zur Hauptseite der Artikelsammlung Hauptseite
in „Spam im Wiki“ · www.mikrocontroller.net · · Screenshots
-
PDF
install_config_WinAVR.pdf
20030424. The 20030424 is a date code, which is discussed later. 2.0 Getting WinAVR The WinAVR website is located at: http://winavr.sourceforge.net/ This site contains information on WinAVR, including some very useful links, notes, and news. You should first go to this site to see if there is any important information you should know about WinAVR before downloading (different releases, etc). You should now go to the SourceForge.net project site for WinAVR, the exact address being: http://sourceforge.net/projects/winavr/ Then scroll to around
in „Debugging einer Test-Schaltung mit Atmega 8515“ · Mikrocontroller und Digitale Elektronik ·
-
PDF
install_config_WinAVR.pdf
20030424. The 20030424 is a date code, which is discussed later. 2.0 Getting WinAVR The WinAVR website is located at: http://winavr.sourceforge.net/ This site contains information on WinAVR, including some very useful links, notes, and news. You should first go to this site to see if there is any important information you should know about WinAVR before downloading (different releases, etc). You should now go to the SourceForge.net project site for WinAVR, the exact address being: http://sourceforge.net/projects/winavr/ Then scroll to around
in „Wie avr-gcc starten?“ · Mikrocontroller und Digitale Elektronik ·
-
PDF
Inline_AVR8ASM_arduino.pdf
eingebundene Bibliothek <avr/io.h>, die u.a. wiederum <avr/sfr_defs.h> und diverse weitere io- Bibliotheken einfügt. Neben den unten genannten Vor- und Nachteilen soll an dieser Stelle ein erster Einblick in die direkte Verwendung
in „Mit dem ATMEL STUDIO 7 klarkommen“ · Mikrocontroller und Digitale Elektronik ·
-
PDF
assembler_arduino.pdf
eingebundene Bibliothek <avr/io.h>, die u.a. wiederum <avr/sfr_defs.h> und diverse weitere io- Bibliotheken einfügt. Neben den unten genannten Vor- und Nachteilen soll an dieser Stelle ein erster Einblick in die direkte Verwendung
in „Arduino Timerprobleme - suche programmierbaren Oszillator“ · Mikrocontroller und Digitale Elektronik ·
-
PDF
nRF24L01plus.pdf
usb-serial",ACTION=="add", KERNELS=="ttyUSB?", MODE="0777", DRIVERS=="ch341-uart", SYMLINK+="nRF24L01Net", RUN+="/bin/stty -F /dev/nRF24L01Net 400:0:1cf2:0:3:1c:7f:15:4:0:1:0:11:13:1a:0:12:f:17:16:0:0:0:0:0:0:0:0:0:0:0:0:0:0:0:0" ergänzt. Sobald ich meinen Serialadapter anstecke wird automatisch der benötigte
in „Repeating und Routing Netzwerk mit Arduino und nRF24L01+“ · Projekte & Code ·
-
PDF
avr-libc-user-manual.pdf
(sfr, bit) do { } while (bit is set(sfr, bit)) #include <avr/io.h> Wait until bit bit in IO register sfr is clear. 5.18.2.10 #define loop until bit is set(sfr, bit) do { } while (bit is clear(sfr, bit)) #include <avr/io.h> Wait until bit bit in IO register sfr
in „C Tutorial gesucht“ · Mikrocontroller und Digitale Elektronik ·
-
Datei
avrasm.txt
und weiterführende Texte und Beispiele wird das Tutorial auf http://www.mikrocontroller.net und das Tutorial auf http://www.avr-asm-tutorial.net empfohlen. 1. Zahlen: ---------- Im Mikrocontroller (MC fürderhin) gibt es Bereiche, die Zahlen speichern. Diese sogenannten Register sind direkt
-
PDF
nRF24L01plus.pdf
........................................................17 11 (IO_ADCLimits) Server > Node 17 Tabelle 16: IO_ADCLimits..............................................................................................17 14 (IO_ACSetup) Server > Node 18 20 (IO_PWMSetup) Server > Node 18 21 (IO_PWMOC1A) Server > Node 18 22 (IO_PWMOC1B) Server > Node 18 24 (IO_PortPulse) Server > Node 18 94 (CG_ReadSet) Server > Node 19 98 (CG_SetSet) Server > Node 19 9C (NN_DefaultPass) Server > Node 19 9D
in „Repeating und Routing Netzwerk mit Arduino und nRF24L01+“ · Projekte & Code ·
-
PDF
AVR-ASM-Tutorial_16_05_08_v3.pdf
• DCF77-Funkwecker mitAVR • Fahrradcomputer • Einfacher und billiger Webserver mitAtMega32 • AVR RFM12 0.6 Tutorials • AVR-Tutorial • AVR-GCC-Tutorial • http://www.avr-asm-tutorial.net - 10 - 0AVR 0.7 Tipps & Hinweise • AVR
in „AVR-ASM-Tutorial: PDF 16.5.08“ · www.mikrocontroller.net ·
-
Datei
main.c
LCD #if USE_SER_LCD udp_lcd_init(); lcd_init(); //lcd_clear(); //back_light = 1; //lcd_print(0,0,"** AVR-NET-IO **"); //lcd_print(1,0,"System: ok"); //lcd_print(2,0,"LCD: ok"); //#if USE_OW //lcd_print(3,0,"1-wire: ok"); //#endif //for(a=0;a<2000000;a++){asm("nop");}; //RoBue -> LCD-Ausgaben: lcd_clear(); lcd_print(0,0,"** AVR-NET-IO **"); lcd_print(2,0,"Counter: "); lcd_print(3,0,"Zeit:"); #endif //Ethernetcard Interrupt enable ETH_INT_ENABLE; #if USE_SER_LCD //RoBue -> IP auf LCD lcd_print(1,0,"%1i.%1i.%1i.%1i",myip[0],
in „AVR für wenig Geld im LAN“ · Mikrocontroller und Digitale Elektronik ·
-
PDF
LCD-Ansteuerung.pdf
#include <avr/io.h> #include <avr/interrupt.h> #include "lcd-routines.h" #include <stdlib.h> //#include "lcd-routines.c" #include <util/delay.h> int main() { Hauptprogramm } ------- //Ansteuerung eines HD44780 kompatiblen LCD im 4-Bit-Interfacemodus // http://www.mikrocontroller.net/articles/HD44780 // http://www.mikrocontroller.net/articles/AVR-GCC-Tutorial/LCD-Ansteuerung // // Die Pinbelegung ist über defines in lcd-routines.h einstellbar #include <avr/io.h> #include "lcd-routines.h
in „LCD ausprobieren“ · Mikrocontroller und Digitale Elektronik ·