1 | /*
|
2 | DMX_Slave.ino - Example code for using the Conceptinetics DMX library
|
3 | Copyright (c) 2013 W.A. van der Meeren <danny@illogic.nl>. All right reserved.
|
4 |
|
5 | This library is free software; you can redistribute it and/or
|
6 | modify it under the terms of the GNU Lesser General Public
|
7 | License as published by the Free Software Foundation; either
|
8 | version 3 of the License, or (at your option) any later version.
|
9 |
|
10 | This library is distributed in the hope that it will be useful,
|
11 | but WITHOUT ANY WARRANTY; without even the implied warranty of
|
12 | MERCHANTABILITY or FITNESS FOR A PARTICULAR PURPOSE. See the GNU
|
13 | Lesser General Public License for more details.
|
14 |
|
15 | You should have received a copy of the GNU Lesser General Public
|
16 | License along with this library; if not, write to the Free Software
|
17 | Foundation, Inc., 51 Franklin St, Fifth Floor, Boston, MA 02110-1301 USA
|
18 | */
|
19 |
|
20 |
|
21 | #include <Conceptinetics.h>
|
22 |
|
23 | //
|
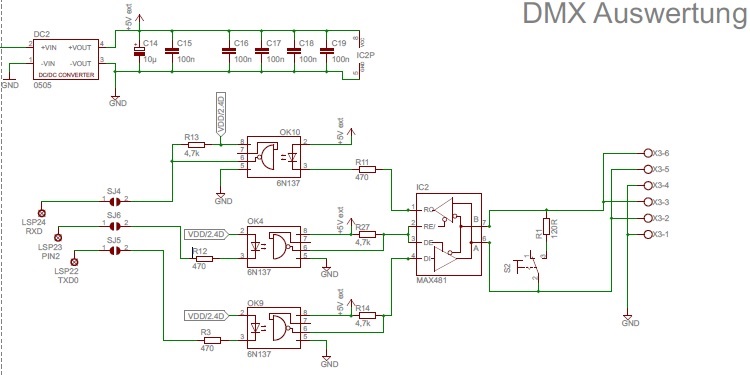
24 | // CTC-DRA-13-1 ISOLATED DMX-RDM SHIELD JUMPER INSTRUCTIONS
|
25 | //
|
26 | // If you are using the above mentioned shield you should
|
27 | // place the RXEN jumper towards G (Ground), This will turn
|
28 | // the shield into read mode without using up an IO pin
|
29 | //
|
30 | // The !EN Jumper should be either placed in the G (GROUND)
|
31 | // position to enable the shield circuitry
|
32 | // OR
|
33 | // if one of the pins is selected the selected pin should be
|
34 | // set to OUTPUT mode and set to LOGIC LOW in order for the
|
35 | // shield to work
|
36 | //
|
37 |
|
38 | //
|
39 | // The slave device will use a block of 10 channels counting from
|
40 | // its start address.
|
41 | //
|
42 | // If the start address is for example 56, then the channels kept
|
43 | // by the dmx_slave object is channel 56-66
|
44 | //
|
45 | #define DMX_SLAVE_CHANNELS 10
|
46 |
|
47 | //
|
48 | // Pin number to change read or write mode on the shield
|
49 | // Uncomment the following line if you choose to control
|
50 | // read and write via a pin
|
51 | //
|
52 | // On the CTC-DRA-13-1 shield this will always be pin 2,
|
53 | // if you are using other shields you should look it up
|
54 | // yourself
|
55 | //
|
56 | ///// #define RXEN_PIN 2
|
57 |
|
58 |
|
59 | // Configure a DMX slave controller
|
60 | DMX_Slave dmx_slave ( DMX_SLAVE_CHANNELS );
|
61 |
|
62 | // If you are using an IO pin to control the shields RXEN
|
63 | // the use the following line instead
|
64 | ///// DMX_Slave dmx_slave ( DMX_SLAVE_CHANNELS , RXEN_PIN );
|
65 |
|
66 | const int ledPin = 13;
|
67 |
|
68 | // the setup routine runs once when you press reset:
|
69 | void setup() {
|
70 |
|
71 | // Enable DMX slave interface and start recording
|
72 | // DMX data
|
73 | dmx_slave.enable ();
|
74 |
|
75 | // Set start address to 1, this is also the default setting
|
76 | // You can change this address at any time during the program
|
77 | dmx_slave.setStartAddress (1);
|
78 |
|
79 | // Set led pin as output pin
|
80 | pinMode ( ledPin, OUTPUT );
|
81 | }
|
82 |
|
83 | // the loop routine runs over and over again forever:
|
84 | void loop()
|
85 | {
|
86 | //
|
87 | // EXAMPLE DESCRIPTION
|
88 | //
|
89 | // If the first channel comes above 50% the led will switch on
|
90 | // and below 50% the led will be turned off
|
91 |
|
92 | // NOTE:
|
93 | // getChannelValue is relative to the configured startaddress
|
94 | if ( dmx_slave.getChannelValue (1) > 127 )
|
95 | digitalWrite ( ledPin, HIGH );
|
96 | else
|
97 | digitalWrite ( ledPin, LOW );
|
98 |
|
99 |
|
100 | }
|

 DMX.jpg
(57 KB)
DMX.jpg
(57 KB)