
Hallo bin schön 2 tage auf diese aufgabe ( 2 ADC kanale zu machen, aber
alles was ich ausprobiert habe geht nicht) ich muss es mit
NUCLEO-G071RBT6?
Kann mir da jemand helfen?
Gast
#7047967
Wenn deine Aufgabe ist "2 Kanäle zu machen" dann bist du schon fertig.

Von der Seite zum STM32G071RB:
"12-bit, 0.4 µs ADC (up to 16 ext. channels)"

Der hat also schon mehr als 2 Kanäle und du musst nichts tun.
Sorry hab gemient 2 Kanäle zu Programieren mit STM32CubeIDE sodass ich
es auch benutzen kann.
Dario S. schrieb:
> Sorry hab gemient 2 Kanäle zu Programieren mit STM32CubeIDE sodass ich
> es auch benutzen kann.

Du gehts auf Analog->ADC und klickst dir die "IN"-Kanäle dazu, die du
haben willst.
Angehängte Dateien:
-
 STM32G071RB.png
(110 KB)
STM32G071RB.png
(110 KB)
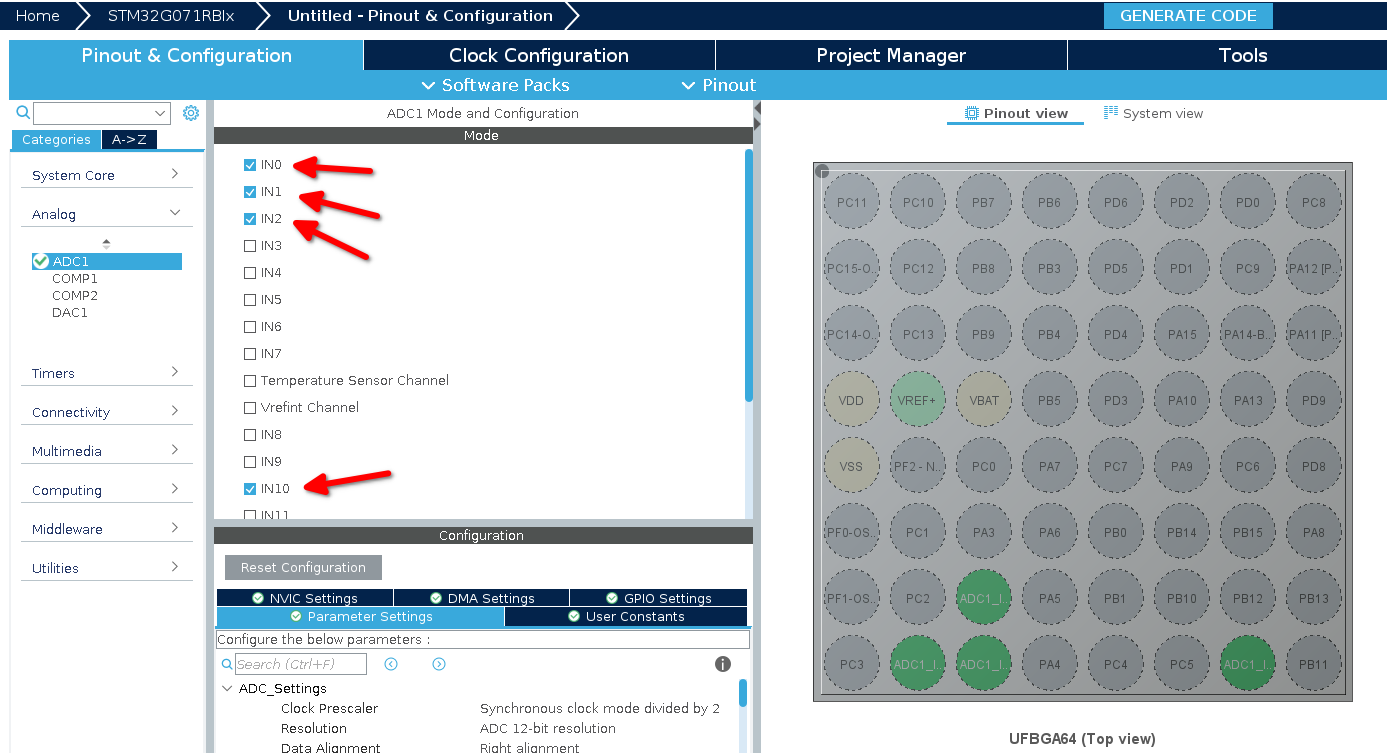
aber wenn ich es versuche zu testen es geht nicht
Gast
#7048581
Dario S. schrieb:
> aber wenn ich es versuche zu testen es geht nicht

Sehr präzise Fehlerbeschreibung...

Normalerweise postet man dann den Quellcode (im Anhang) und Schaltplan.
Hier ist was ich habe:
/* USER CODE BEGIN Header */
/**
  ************************************************************************
******
  * @file           : main.c
  * @brief          : Main program body
  ************************************************************************
******
  * @attention
  *
  * Copyright (c) 2022 STMicroelectronics.
  * All rights reserved.
  *
  * This software is licensed under terms that can be found in the
LICENSE file
  * in the root directory of this software component.
  * If no LICENSE file comes with this software, it is provided AS-IS.
  *
  ************************************************************************
******
  */
/* USER CODE END Header */
/* Includes
------------------------------------------------------------------*/
#include "main.h"

/* Private includes
----------------------------------------------------------*/
/* USER CODE BEGIN Includes */

/* USER CODE END Includes */

/* Private typedef
-----------------------------------------------------------*/
/* USER CODE BEGIN PTD */

/* USER CODE END PTD */

/* Private define
------------------------------------------------------------*/
/* USER CODE BEGIN PD */
/* USER CODE END PD */

/* Private macro
-------------------------------------------------------------*/
/* USER CODE BEGIN PM */

/* USER CODE END PM */

/* Private variables
---------------------------------------------------------*/
 ADC_HandleTypeDef hadc1;

/* USER CODE BEGIN PV */

/* USER CODE END PV */

/* Private function prototypes
-----------------------------------------------*/
void SystemClock_Config(void);
static void MX_GPIO_Init(void);
static void MX_ADC1_Init(void);
/* USER CODE BEGIN PFP */

/* USER CODE END PFP */

/* Private user code
---------------------------------------------------------*/
/* USER CODE BEGIN 0 */

/* USER CODE END 0 */

/**
  * @brief  The application entry point.
  * @retval int
  */
int main(void)
{
  /* USER CODE BEGIN 1 */

  /* USER CODE END 1 */

  /* MCU
Configuration--------------------------------------------------------*/

  /* Reset of all peripherals, Initializes the Flash interface and the
Systick. */
  HAL_Init();

  /* USER CODE BEGIN Init */

  /* USER CODE END Init */

  /* Configure the system clock */
  SystemClock_Config();

  /* USER CODE BEGIN SysInit */

  /* USER CODE END SysInit */

  /* Initialize all configured peripherals */
  MX_GPIO_Init();
  MX_ADC1_Init();
  /* USER CODE BEGIN 2 */

  /* USER CODE END 2 */

  /* Infinite loop */
  /* USER CODE BEGIN WHILE */
  while (1)
  {
    /* USER CODE END WHILE */

    /* USER CODE BEGIN 3 */
  }
  /* USER CODE END 3 */
}

/**
  * @brief System Clock Configuration
  * @retval None
  */
void SystemClock_Config(void)
{
  RCC_OscInitTypeDef RCC_OscInitStruct = {0};
  RCC_ClkInitTypeDef RCC_ClkInitStruct = {0};

  /** Configure the main internal regulator output voltage
  */
  HAL_PWREx_ControlVoltageScaling(PWR_REGULATOR_VOLTAGE_SCALE1);

  /** Initializes the RCC Oscillators according to the specified
parameters
  * in the RCC_OscInitTypeDef structure.
  */
  RCC_OscInitStruct.OscillatorType = RCC_OSCILLATORTYPE_HSI;
  RCC_OscInitStruct.HSIState = RCC_HSI_ON;
  RCC_OscInitStruct.HSIDiv = RCC_HSI_DIV1;
  RCC_OscInitStruct.HSICalibrationValue = RCC_HSICALIBRATION_DEFAULT;
  RCC_OscInitStruct.PLL.PLLState = RCC_PLL_NONE;
  if (HAL_RCC_OscConfig(&RCC_OscInitStruct) != HAL_OK)
  {
    Error_Handler();
  }

  /** Initializes the CPU, AHB and APB buses clocks
  */
  RCC_ClkInitStruct.ClockType = RCC_CLOCKTYPE_HCLK|RCC_CLOCKTYPE_SYSCLK
                              |RCC_CLOCKTYPE_PCLK1;
  RCC_ClkInitStruct.SYSCLKSource = RCC_SYSCLKSOURCE_HSI;
  RCC_ClkInitStruct.AHBCLKDivider = RCC_SYSCLK_DIV1;
  RCC_ClkInitStruct.APB1CLKDivider = RCC_HCLK_DIV1;

  if (HAL_RCC_ClockConfig(&RCC_ClkInitStruct, FLASH_LATENCY_0) !=
HAL_OK)
  {
    Error_Handler();
  }
}

/**
  * @brief ADC1 Initialization Function
  * @param None
  * @retval None
  */
static void MX_ADC1_Init(void)
{

  /* USER CODE BEGIN ADC1_Init 0 */

  /* USER CODE END ADC1_Init 0 */

  ADC_ChannelConfTypeDef sConfig = {0};

  /* USER CODE BEGIN ADC1_Init 1 */

  /* USER CODE END ADC1_Init 1 */

  /** Configure the global features of the ADC (Clock, Resolution, Data
Alignment and number of conversion)
  */
  hadc1.Instance = ADC1;
  hadc1.Init.ClockPrescaler = ADC_CLOCK_SYNC_PCLK_DIV2;
  hadc1.Init.Resolution = ADC_RESOLUTION_12B;
  hadc1.Init.DataAlign = ADC_DATAALIGN_RIGHT;
  hadc1.Init.ScanConvMode = ADC_SCAN_DISABLE;
  hadc1.Init.EOCSelection = ADC_EOC_SINGLE_CONV;
  hadc1.Init.LowPowerAutoWait = DISABLE;
  hadc1.Init.LowPowerAutoPowerOff = DISABLE;
  hadc1.Init.ContinuousConvMode = ENABLE;
  hadc1.Init.NbrOfConversion = 1;
  hadc1.Init.ExternalTrigConv = ADC_SOFTWARE_START;
  hadc1.Init.ExternalTrigConvEdge = ADC_EXTERNALTRIGCONVEDGE_NONE;
  hadc1.Init.DMAContinuousRequests = DISABLE;
  hadc1.Init.Overrun = ADC_OVR_DATA_PRESERVED;
  hadc1.Init.SamplingTimeCommon1 = ADC_SAMPLETIME_1CYCLE_5;
  hadc1.Init.SamplingTimeCommon2 = ADC_SAMPLETIME_1CYCLE_5;
  hadc1.Init.OversamplingMode = DISABLE;
  hadc1.Init.TriggerFrequencyMode = ADC_TRIGGER_FREQ_HIGH;
  if (HAL_ADC_Init(&hadc1) != HAL_OK)
  {
    Error_Handler();
  }

  /** Configure Regular Channel
  */
  sConfig.Channel = ADC_CHANNEL_0;
  sConfig.Rank = ADC_REGULAR_RANK_1;
  sConfig.SamplingTime = ADC_SAMPLINGTIME_COMMON_1;
  if (HAL_ADC_ConfigChannel(&hadc1, &sConfig) != HAL_OK)
  {
    Error_Handler();
  }
  /* USER CODE BEGIN ADC1_Init 2 */

  /* USER CODE END ADC1_Init 2 */

}

/**
  * @brief GPIO Initialization Function
  * @param None
  * @retval None
  */
static void MX_GPIO_Init(void)
{

  /* GPIO Ports Clock Enable */
  __HAL_RCC_GPIOA_CLK_ENABLE();

}

/* USER CODE BEGIN 4 */

/* USER CODE END 4 */

/**
  * @brief  This function is executed in case of error occurrence.
  * @retval None
  */
void Error_Handler(void)
{
  /* USER CODE BEGIN Error_Handler_Debug */
  /* User can add his own implementation to report the HAL error return
state */
  __disable_irq();
  while (1)
  {
  }
  /* USER CODE END Error_Handler_Debug */
}

#ifdef  USE_FULL_ASSERT
/**
  * @brief  Reports the name of the source file and the source line
number
  *         where the assert_param error has occurred.
  * @param  file: pointer to the source file name
  * @param  line: assert_param error line source number
  * @retval None
  */
void assert_failed(uint8_t *file, uint32_t line)
{
  /* USER CODE BEGIN 6 */
  /* User can add his own implementation to report the file name and
line number,
     ex: printf("Wrong parameters value: file %s on line %d\r\n", file,
line) */
  /* USER CODE END 6 */
}
#endif /* USE_FULL_ASSERT */
Angehängte Dateien:
-
 2022-04-29_13h39_21.png
(10 KB)
2022-04-29_13h39_21.png
(10 KB)
Gast
#7049788
Was ist so schwer daran, den Hinweis über dem Eingabefeld zu beachten?:
> Längeren Sourcecode nicht im Text einfügen, sondern als Dateianhang

Liest du wenigstens das Datenblatt, das reference Manual und die Doku
der HAL? Oder gibt es dafür eine App, die alles von alleine macht?
Gast
#7049825
Stefan ⛄ F. schrieb:
> Liest du wenigstens das Datenblatt, das reference Manual und die Doku
> der HAL? Oder gibt es dafür eine App, die alles von alleine macht?

Und nicht zu vergessen: Die Briefmarke
https://www.mikrocontroller.net/attachment/555442/2022-04-29_13h39_21.png

Dario S. schrieb:
> hadc1.Init.NbrOfConversion = 1;

Du hattest doch geschrieben, dass du zwei Kanäle messen willst.
Ich finde die Lösung per DMA sehr praktisch (, und wenn man das Prinzip
verstanden hat, auch sehr einfach).

Man kann aber auch das ganze ADC-Wandelgeraffel "manuell" durchführen.

Die App macht das anfang sozusagen selber ich hab ja die 2 ADC pin
einmarkiert und des hat der selber geschrieben.
Gast
#7049851
Dario S. schrieb:
> Die App macht das anfang sozusagen selber ich hab ja die 2 ADC pin
> einmarkiert und des hat der selber geschrieben.

Stefan meinte wohl eher, ob die App auch das Datenblatt, das Reference
Manual etc. für dich liest.
In dem Code, den CubeMX erstellt gibt es noch eine Menge Platz für "user
defined functions".
Die musst du (als User) erzeugen. Dazu gehört dann auch das Starten der
AD-Wandlungen. Die Werte kann man sich natürlich per Debugger ansehen,
aber eine Ausgabe auf der seriellen Schnittstelle ist da doch etwas
komfortabler.
und wie mache ich des mit debugger und mit starten von adc
Gast
#7052046
Dario S. schrieb:
> und wie mache ich des mit debugger und mit starten von adc

Hast du wenigstens einen Blick in die Dokumentation der HAL geworfen?
Ich habe nicht den Eindruck. Falls doch, und du verstehst sie nicht, ist
vielleicht ein einfacheres System wie der Arduino Uno eher für dich
geeignet.

Was ist das denn für eine "Aufgabe"? Wurde dir die Hardware und Software
vorgeschrieben, ohne sie Schritt-Für-Schritt kennen zu lernen?
Gast
#7052056
Dario S. schrieb:
> und wie mache ich des mit debugger und mit starten von adc
Indem du dich darüber beliest, wie man sowas macht, denn:
> bin schön 2 tage auf diese aufgabe
Irgendjemand scheint DIR dieser Aufgabe ja gegeben zu haben, in der
Hoffnung, dass du sie lösen kannst
Gast
#7052062
Dario S. schrieb:
> bin schön 2 tage auf diese aufgabe

In zwei Tagen lernt niemand den Umgang mit Mikrocontrollern. Schon gar
nicht diese komplexen ARM Dinger samt Framework.

Da würde ich eher 2 Monate ansetzen, bevor man etwas vorzeigbares hat.
Gast
#7052164
Das schöne ist, dass man als Hersteller heutzutage keine Dokumentation
mehr liefern muss. Denn da schaut ja doch keiner mehr rein, und liest
wie es geht.

Was machen die 'Neuen Programmierer' allerdings, wenn die alte, des
Lesens mächtige Garde einmal abtritt. Wer schaut dann für sie in die
Handbücher?
Antwort schreiben
Bitte melde dich an, um einen Beitrag zu schreiben.