Hallo,

ich versuche den MEGA-1284P Xplained über USB mit avrdudue anzusprechen.
Nach Infos in
https://ww1.microchip.com/downloads/en/Appnotes/doc8374.pdf
und im Internet sollte das mit der Option -c avr911 -b 57600 gehen.
"The communication port settings (baud rate, parity control etc.) must
be set manually before using AVROSP. The needed settings are 57600bps,
no parity control and eight data bits."
Das klappt aber nicht. Auch nicht wenn ich Reset und SW0 drücke und SW0
später loslasse um den Bootloader zu aktivieren.
1
~$ lsusb
2
Bus 001 Device 005: ID 03eb:2122 Atmel Corp. XMEGA-A1 Explained evaluation kit
3
4
~$ ls -lah /dev/ttyACM0
5
crw-rw----+ 1 root dialout 166, 0 Dec 10 16:22 /dev/ttyACM0
Hallo,

dafür benötigst du einen Bootloader. Kapitel 5.
Wenn der Controller zwischendurch mittels ISP geflashst wurde ist der
Bootloader dabei immer weg und muss neu geflasht werden. Hast du einen
Programmer zur Hand?
To perform a command, enter command number or command string
25
26
MEGA-1284P Xplained>2
27
28
MEGA-1284P Xplained>3
29
NTC ADC value: 450
Kann ich auch mit minicom und dem bootloader ein hex in den flash
schreiben oder braucht es dazu ein Programm wie avrdude? Bisher habe ich
ATmegas nur ohne bootloader mit avrdude per ISP programmiert.
Veit D. schrieb:> Die Baudrate vom Bootloader ist bekannt?
Ja, die ist bekannt.
Alexander S. schrieb:> The needed settings are 57600bps,> no parity control and eight data bits.
Alexander S. schrieb:> Programmer supports the following devices:
Das ist irgendwie seltsam.
Vielleicht solltest du deinen eigenen Bootloader lieber benutzen. Dieses
uralte AVR109/AVR911 Protokoll ist nicht sonderlich toll und offenbar
oft noch schlechter implementiert.
1
/* Tell the programmer which part we selected.
2
According to the AVR109 code, this is ignored by the bootloader. As
3
some early versions might not properly ignore it, rather pick up the
4
first device type as reported above than anything out of avrdude.conf,
5
so to avoid a potential conflict. There appears to be no general
6
agreement on AVR910 device IDs beyond the ones from the original
7
appnote 910. */
8
9
buf[0]='T';
10
buf[1]=devtype_1st;
11
12
butterfly_send(pgm,buf,2);
13
if(butterfly_vfy_cmd_sent(pgm,"select device")<0)
14
return-1;
Problem in deinem Falle ist aber, dass der Bootloader ja behauptet, kein
einziges device zu unterstützen.

Das ganze Konzept von "device codes" (als einzelne Bytes) in diesem
Protokoll ist grottig.

Wenn du irgendwie kannst, such dir irgendeinen Bootloader, der
STK500v2-Protokoll spricht, und benutze diesen. Alternativ kannst du dir
natürlich auch die Quellen von dem alten Butterfly/AVR911-Bootloader
schnappen und schauen, dass er zumindest einen brauchbaren device code
produziert. Oder aber du hackst AVRDUDE, dass es gar keinen device code
erst aussuchen will – ist ja bei einem Bootloader ohnehin egal, der hat
nur genau ein device. (Das Protokoll AVR109 war ursprünglich für einen
standalone programmer konzipiert worden.)
Programmer supports buffered memory access with buffersize=256 bytes.
3
avrdude: Send: t [74]
4
5
Programmer supports the following devices:
6
avrdude: Recv: . [00]
7
8
avrdude: Send: T [54] . [00]
9
avrdude: Recv: . [00]
10
avrdude: error: programmer did not respond to command: select device
11
avrdude: initialization failed, rc=-1
12
Double check connections and try again, or use -F to override
13
this check.
14
15
avrdude: Send: L [4c]
16
avrdude: Recv: . [0d]
17
avrdude: Send: E [45]
18
avrdude: Recv: . [0d]
19
20
avrdude done. Thank you.
Das ist wahrscheinlich keine neue Info für Dich. Ich schreibe das nur
der Vollständigkeit halber.

P.S. Mich wundert schon etwas, dass ich so wenig im Internet zu dem
Problem finde. Das MEGA1284P XPLAINED gibt es ja schon lange und ich
kann doch nicht der erste sein, der das mit avrdude und bootloader
nutzen möchte.
Naja, das, was ich damals dazu geschrieben habe, haben wir ja dann
implementiert. Hilft nur in deinem Falle nicht, weil dein Bootloader ja
gleich mal keinen einzigen Code als "supported" zurück gibt.

Ja, das Board gibt es schon lange, aber vermutlich benutzen nur wenige
den Bootloader überhaupt. Die Nachfolger des alten XPLAINED hatten dann
später auch einen Onboard-Programmer drauf (EDBG oder mEDBG), das mit
dem 1284 war eins der ersten, da gab es sowas noch nicht.
Hallo,

Alexander. Nimm mal einen Bootloader von MCUDude. Damit wird alles
geflasht was Arduino like mit USB programmiert wird. avrdude Option war
dann entweder wiring oder carduino.
Veit D. schrieb:> Nimm mal einen Bootloader von MCUDude.
Hat auch gleich den Vorteil dass du, wenn damit was nicht funktioniert,
bei Hans direkt nachfragen kannst. Er ist einer der drei derzeit sehr
aktiven Entwickler im AVRDUDE-Projekt. ;-)
Hallo,

wie das immer so zusammenpasst.  ;-)

Ich habe das nochmal nachgestellt. Folgende Zeile müsstest du ggf. Linux
spezifisch anpassen. Das sollte funktionieren. Also erst Bootloader von
MCUdude flashen und dann per USB mit Baudrate vom geflashten Bootloader
und avrdude usw.
1
avrdude-v-patmega1284p-curclock-PCOM4-b115200-D
Mir fällt da nochwas ein. Hast du die Resetleitung angepasst? Weil das
Resetsignal kommt vom DTR. Sonst kann avrdude den Controller nicht in
den Bootloader-Mode versetzen. Siehe ganz unten
https://github.com/MCUdude/MightyCore
Veit D. schrieb:> Also erst Bootloader von> MCUdude flashen und dann per USB mit Baudrate vom geflashten Bootloader> und avrdude usw.
Hallo Veit,
Moment, nicht ganz so schnell.
Wie geschrieben, programmiere ich normalerweise per ISP. Da es für das
MEGA1284P XPLAINED einen Bootloader und ein Beispielprogramm von Atmel
gibt, wollte ich das einfach mal ausprobieren. Der Empfehlung einen
anderen Bootloader auszuprobieren folge ich gerne. Wenn ich aber auf
https://github.com/MCUdude/MightyCore lese
"An Arduino core for ATmega8535, ATmega16, ATmega32, ATmega164,
ATmega324, ATmega644 and ATmega1284, all running the Urboot bootloader.
..." dann frage ich mich, ob ich nicht nur den Urboot bootloader
brauche. Warum soll ich mir das ganze MightyCore Framework installieren?
"... Boards Manager Installation
This installation method requires Arduino IDE version 1.8.0 or greater."
Brauche ich die wirklich nur um einen bootloader zu installieren?
Veit D. schrieb:> Mir fällt da nochwas ein. Hast du die Resetleitung angepasst? Weil das> Resetsignal kommt vom DTR. Sonst kann avrdude den Controller nicht in> den Bootloader-Mode versetzen. Siehe ganz unten> https://github.com/MCUdude/MightyCore
Angepasst habe ich an der HW nichts. Bisher habe ich ja nur nur den
bootlaoder aus
https://ww1.microchip.com/downloads/en/Appnotes/AVR370_MEGA_1284P_Xplained_Example_Application.zip
ausprobiert.
Ich werde erst einnmal schauen welche optionalen Bootloader es für das
MEGA1284P XPLAINED gibt. Ein einzelnes .hex oder der source code dafür
und ein bootloader der ohne HW-Modifikationen funktioniert wäre mir
lieber.
P.S. Ich werde wahrscheinlich erst am Wochenende dazukommen.
File "/home/alesi/AVR/avr-aosp/avr-aosp.py", line 329, in <module>
18
main()
19
File "/home/a.../AVR/avr-aosp/avr-aosp.py", line 307, in main
20
GetParams( fd )
21
File "/home/a.../AVR/avr-aosp/avr-aosp.py", line 98, in GetParams
22
print (" N =", fd.read(1).decode(), "\t#high fuse bits")
23
UnicodeDecodeError: 'utf-8' codec can't decode byte 0x97 in position 0: invalid start byte
Bei den <> im usage string für start und stop bin ich mir nicht sicher,
ob die eingegeben werden sollen. Mit <> kommt aber der gleiche Fehler.
Benutzt jemand hier avr-aosp.py ?

Dann könnte ich noch den AVR Open Source Programmer (AVROSP) unter wine
ausprobieren. Ich kann das
http://www.atmel.com/dyn/resources/prod_documents/AVR911.zip aber auf
der microchip Seite nicht finden.
Hallo,

ähm nein, du sollst nichts installieren oder Dergleichen. Du sollst nur
einen Bootloader von MCUdude für deinen ATmega1284p verwenden.
Hier ist der korrekte Link dorthin.
Beitrag "Re: MEGA1284P XPLAINED über USB mit avrdudue programmieren"

Ich kenne das XPLAINED Board nicht. Müßte man den Schaltplan anschauen.
Die Frage lautet wie Atmel sich damals gedacht hat den Controller zu
reseten damit der Bootloader Mode aktiv wird um überhaupt die Chance zu
haben Serial sein Programm zu flashen.

Wenn der Bootloader drauf ist und man möchte per USB ein Programm
aufspielen, was am Ende immer auf Serial hinausläuft, dann muss ja
irgendwas den Controller reseten können. Der Bootloader ist nach Reset
immer nur kurz aktiv, danach startet er sein Programm was drauf ist.
Vielleicht verstehst du jetzt den Ablauf besser. Also nur Rx/Tx Leitung
am Controller kann dafür nicht ausreichend sein.
Jörg W. schrieb:> Gönn dir doch lieber einen schönen Bootloader
Kannst Du einen von denen unter
https://www.mikrocontroller.net/articles/Bootloader#AVR oder einen
anderen schlanken (d.h. ohne Arduino Framework) empfehlen?
Es interessiert mich schon, ob das unter wine oder windows so
funktioniert wie von Atmel beschrieben.
Hallo,

löse dich mal von dem Gedanken "Arduino". Nur weil die Bootloader
Dateien zu einem Arduino Core Package Projekt gehören kann man die ganz
normal ohne Arduino verwenden. Ich dachte nun wirklich das wäre deutlich
gewesen.
Alexander S. schrieb:> Kannst Du einen … empfehlen?
Erstmal: ein Bootloader wird wohl sicher kein Arduino Framework nehmen.
Zweitens, Stefan Ruegers urboot wurde dir schon nahe gelegt.
https://github.com/stefanrueger/urboot
Bonus: auch wenn Stefan in Großbritannien lebt, er spricht deutsch,
falls du Fragen an ihn hast. ;-) Stefan hat von mir die Federführung für
AVRDUDE übernommen. Es lohnt sich also durchaus, auch mal eine aktuelle
Version davon zu benutzen.
Veit D. schrieb:> Ich kenne das XPLAINED Board nicht. Müßte man den Schaltplan anschauen.> Die Frage lautet wie Atmel sich damals gedacht hat den Controller zu> reseten damit der Bootloader Mode aktiv wird um überhaupt die Chance zu> haben Serial sein Programm zu flashen.
Es sind drei Taster auf dem Board. Mit SW0 nach Reset loslassen kommt
man in den bootloader Modus.
Veit D. schrieb:> Du sollst nur> einen Bootloader von MCUdude für deinen ATmega1284p verwenden.> Hier ist der korrekte Link dorthin.> Beitrag "Re: MEGA1284P XPLAINED über USB mit avrdudue programmieren"
Das war mir nicht wirklich klar. Ich hatte noch nicht genug unter
https://github.com/MCUdude/MightyCore gelesen.
Weder im AVR370: MEGA-1284P Xplained Getting Started Guide noch im
AVR364: MEGA-1284P Xplained Hardware User's Guide finde ich Infos zur
Clock des MEGA1284P XPLAINED. avrdude sagt
1
avrdude: safemode: lfuse reads as F7
2
avrdude: safemode: hfuse reads as 9A
3
avrdude: safemode: efuse reads as FF
4
avrdude: safemode: Fuses OK (E:FF, H:9A, L:F7)
und https://www.engbedded.com/fusecalc/ sagt damit "CKDIV8 nicht
programmiert".
Das Datenblatt sagt "9.2.1 Default Clock Source The device is shipped
with internal RC oscillator at 8.0MHz". Demnach sollte er mit 8 MHz
laufen, wenn er keinen externen Quarz hat. Mit 3.3 V kann er bis zu
10MHz.
Veit D. schrieb:> Dann bin ich frohen Mutes ...
Bleibt nur noch:
Veit D. schrieb:> Hast du die Resetleitung angepasst? Weil das> Resetsignal kommt vom DTR.
Moin,
Ich dachte
> Es sind drei Taster auf dem Board.> Mit SW0 nach Reset loslassen kommt> man in den bootloader Modus.
Probiere es aus. Gibt es einen Schaltplan vom Board für den Fall der
Fälle?
Hallo,

habe den Board Schaltplan gefunden. Als USB-Serial Wandler sitzt hier
eine AT32UC3B1256 drauf. Von dem geht eine Leitung zum ATmega1284P Reset
Pin. Der sollte das Arduino like automatisch machen. An dem AT32UC3B1256
fummelst du ja nicht rum und solltest auch nicht daran rum fummeln. Ich
sehe das immer noch so das der ATmega1284P den Bootloader benötigt und
dann sollte das funktionieren.

Was noch sein kann ist das die Fuse vom ATmega1284P vorher eingestellt
werden müssen. Sonst ist der Bootloader wieder weg nach eigentlichen
Programm flashen, weil der Speicherbereich nicht reserviert/geschützt
wurde. Im Zweifelsfall konfigurierst du die größte Bootloadergröße.
Damit verschenkst du nur paar Bytes Flashspeicher, mehr Nachteil hat man
dadurch nicht.
Veit D. schrieb:> Als USB-Serial Wandler sitzt hier eine AT32UC3B1256 drauf.
Dann sollte der doch aber auch direkt den ATmega1284 programmieren
können, ohne irgendwelche Bootloader da drauf. Diese UC3 wurden später
als EDBG (Embedded Debugger) auf die diversen Xplained* gebaut – ich
dachte nur zuerst, dieser Ur-Prototyp eines Xplained hätte den noch
nicht gehabt.
Als was für ein Gerät meldet der sich denn am USB?
Die LED an SW0 bzw. an PB0 vom ATmega1284P leuchtet und flackert
zwischendurch.

Den bootloader ohne etwas zu programmieren über USB mit avrdude
anzusprechen, funktioniert noch nicht. Weder kurz nach Reset noch kurz
nach SW0 nach Reset loslassen:
Copyright (c) 2000-2005 Brian Dean, http://www.bdmicro.com/
5
Copyright (c) 2007-2014 Joerg Wunsch
6
7
System wide configuration file is "/etc/avrdude.conf"
8
User configuration file is "/home/a.../.avrduderc"
9
User configuration file does not exist or is not a regular file, skipping
10
11
Using Port : /dev/ttyACM0
12
Using Programmer : wiring
13
Overriding Baud Rate : 57600
14
avrdude: wiring_open(): releasing DTR/RTS
15
ioctl("TIOCMSET"): Connection timed out
16
avrdude: wiring_open(): asserting DTR/RTS
17
ioctl("TIOCMSET"): Connection timed out
18
avrdude: ser_recv(): programmer is not responding
19
avrdude: stk500v2_ReceiveMessage(): timeout
20
avrdude: ser_recv(): programmer is not responding
21
avrdude: stk500v2_ReceiveMessage(): timeout
22
avrdude: ser_recv(): programmer is not responding
23
avrdude: stk500v2_ReceiveMessage(): timeout
24
avrdude: ser_recv(): programmer is not responding
25
avrdude: stk500v2_ReceiveMessage(): timeout
26
avrdude: ser_recv(): programmer is not responding
27
avrdude: stk500v2_ReceiveMessage(): timeout
28
avrdude: ser_recv(): programmer is not responding
29
avrdude: stk500v2_ReceiveMessage(): timeout
30
avrdude: stk500v2_getsync(): timeout communicating with programmer
31
32
avrdude done. Thank you.
Die oben von Veit genannten programmer (Option -c) urclock oder carduino
kennt mein avrdude: Version 6.3-20171130 (Debian oldstable) nicht.

Ich muss mich noch schlau lesen, wie ich den optiboot nutze. Ich habe
momentan wenig Zeit. Am Wochenende evtl. mehr. Trotzdem schon mal vielen
Dank.
Jörg W. schrieb:> Als was für ein Gerät meldet der sich denn am USB?
Das habe ich erst nach meinem letzten Beitrag gelesen. Die Ausgabe von
lsusb hatte ich ja schon gezeigt.
1
$ lsusb -s 001:004
2
Bus 001 Device 004: ID 03eb:2122 Atmel Corp. XMEGA-A1 Explained evaluation kit
OK, dann hat er zumindest leider noch keine EDBG-Firmware drauf. Die
würde sich mit "CMSIS-DAP" im Produktnamen melden.

Aber von dem Teil gehen Leitungen zum SPI des ATmega1284 (und zum I²C
und zur UART). Es wäre doch wirklich mehr als seltsam, wenn sie da nicht
irgendein Programmier-Interface drin hätten.
Hallo,

ich kenne jetzt nicht den Grundgedanken des AT32UC3B1256 auf dem
Xplained Board, wenn das üblicherweise mittels ISP programmiert wird.
Aber allein die Verschaltung sieht aus so wie ich das von Arduino kenne.
USB-Serial Wandler per Tx/Rx und Reset am eigentlichen Controller
gekoppelt. Deswegen benötigt der zu programmierende Controller einen
Bootloader, sonst weiß der nicht das die Daten über Serial reinkommen
zum flashen.
Oder anders gesagt, der AT32UC3B1256 ist nur der Ersatz für einen FTDI
oder CH340. Genauso wie ein ATmega16U2 auf den original Arduinos der
Ersatz dafür ist. Wenn das nicht so wäre würde alles keinen Sinn
ergeben. Sehe ich jedenfalls aktuell so.

Im Vergleich zur Arduino Schaltung fehlt der R und C in/an der
Resetleitung, aber das muss nichts bedeuten. Das kann und wird Atmel im
AT32UC3B1256 ganz sicher nur anders in Software gelöst haben um ein
kurzes Resetsignal auszugeben.

Per USB am Rechner muss sich der AT32UC3B1256 melden, wenn der passende
Treiber installiert ist. Oder gibt einen Standardtreiber dafür? Die
genaue Auskunft muss Alexander geben. Ich habe das Board nicht.

Nicht das wir uns falsch verstehen. Ich transferiere mein Wissen wie
Arduino-Boards und eigens gebaute Boards funktionieren. Laut meiner
Logik bleiben da auch (fast) keine anderen Möglichkeiten. Irgendwas muss
den ATmega1284P reseten und damit in den Bootloadermode versetzen. Das
kann nur der AT32UC3B1256 machen, zudem die Verbindung vorhanden ist.

EDBG kenne ich vom Arduino Nano Every, da sitzt ein SAMD11 drauf der als
EDBG bezeichnet wird. Oder auf den Microchip Curiosity Boards
(Atmega4809, AVR128DB48) sitzt ein SAMDxx drauf. Die Grundfunktion (und
mehr) ist ein USB-Serial Wandler zu sein. Das sind alles Boards mit
Controller die eigentlich per UPDI programmiert werden. Hier haben die
eigentlichen Controller keinen Bootloader drauf.

Nun ist die Frage ist der AT32UC3B1256 auf dem Xplained ein "EDBG" oder
stellt er nur einen USB-Serial Wandler dar. Bin der Meinung Letzteres.
War EDBG zu ATmega1284P Zeiten schon üblich? Im Schaltplan fehlt mir die
Bezeichnung EDBG.

Ich lasse mich jedoch gern eines Besseren Belehren.  :-)

Edit:
Hat sich jetzt teilweise überschnitten.
Hallo,

am avrdude soll es nun nicht scheitern. Ob dir eine aktuelle Version
wirklich hilft wird sich zeigen. Jedenfalls ist die aktuellste Version
hier zu finden.
https://github.com/mcuee/avrdude/releases/tag/v7.2
Hallo,

bin mir fast sicher das Problem gefunden zu haben. Korrigiert mich wenn
ich falsch liege.

Im Schaltplan geht Tx/Rx vom AT32UC3B1256 an UART1 am ATmega1284P. Alex
hat den Bootloader verwendet mit folgenden Namen:
optiboot_flash_atmega1284p_UART0_57600_11059200L_B0_BIGBOOT.hex
Also für UART0.
Wenn Alex den für UART1 flasht könnte es klappen.
Hallo,

nachdem ich auf https://github.com/stefanrueger/urboot
"Avrdude (from v7.1 onwards) supports urboot bootloaders with -c
urclock"
gelesen habe, habe ich auf einen anderen Rechner mit Debian stable
gewechselt. Debian stable hat avrdude: Version 7.1.
Leider funktioniert es mit avrdude: Version 7.1 und -c urclock immer
noch nicht:
Hallo,

in den avrdude Option muss man keine bootsize angeben. Das sollte man
vorher per Fuse einstellen. Ich habe jedenfalls bis jetzt alles wenn
notwendig per Fuse gemacht. Danach nochmal Bootloader flashen.
Veit D. schrieb:> Aber allein die Verschaltung sieht aus so wie ich das von Arduino kenne.
Nein, deutlich anders/mehr. Neben UART Rx/Tx (und I²C) ist eben auch SPI
komplett gekoppelt. Damit könnte der UC3 den gesamten ISP-Kram selbst
machen.
Ist halt nur eine Frage, ob er dafür irgendwas drauf hat. Ich kann mir
eigentlich nicht vorstellen, dass man den nur als UART-Bridge vorgesehen
hat.
Jörg W. schrieb:> Ist halt nur eine Frage, ob er dafür irgendwas drauf hat. Ich kann mir> eigentlich nicht vorstellen, dass man den nur als UART-Bridge vorgesehen> hat.
AVR364: MEGA-1284P Xplained HardwareUser's Guide
https://ww1.microchip.com/downloads/en/Appnotes/doc8377.pdf
...
6.5 Board controller
The Atmel AT32UC3B1256 board controller and the Atmel ATmega1284P are
connected through TWI, SPI, and USART interfaces. All interfaces can be
used to communicate between the devices, but only the USART is
implemented by default on the board controller. ...
Hallo,

du meinst der AT32UC3B1256 könnte der komplette Programmer Ersatz sein.
Ich habe keine Ahnung ob das klappt. Ist aber denkbar wenn du das so
schreibst.

Gibt es es jemanden im Forum der das Board oder ähnliches hat und mehr
dazu sagen könnte?
Veit D. schrieb:> du meinst der AT32UC3B1256 könnte der komplette Programmer Ersatz sein.> Ich habe keine Ahnung ob das klappt.
Die späteren Xplained* Boards hatten auch einen UC3, der war aber mit
einer EDBG-Firmware. Ich vermute, dass man die leider nicht separat
bekommen können wird (um den UC3 selbst damit zu flashen). Diese EDBGs
wurden dann auch separat von Atmel/Microchip vermarktet und waren
eigentlich die letzte Domäne der UC3 (und damit der AVR32). Mittlerweile
sind sie aber auch von SAMD21 abgelöst worden, die auf den neueren
Boards als EDBG fungieren.
Die Funktion dieser Chips ist zu großen Teilen von den AtmelICE
übernommen worden.
Naja, dieses 1284-Board war wohl vor 15+ Jahren wirklich der erste
Versuch in Richtung dieser neueren Devboards.
Jörg W. schrieb:> Die späteren Xplained* Boards hatten auch einen UC3, der war aber mit> einer EDBG-Firmware. Ich vermute, dass man die leider nicht separat> bekommen können wird (um den UC3 selbst damit zu flashen).
AVR370: MEGA-1284P Xplained Getting Started Guide
https://ww1.microchip.com/downloads/en/Appnotes/doc8374.pdf
...
6.1 Preprogrammed firmware
...
The Atmel AT32UC3B1256 board controller is also pre-programmed with a
bootloader and an USART-to-USB gateway application which can be used to
communicate with the target controller ATmega1284P.
Zu mindestens an die Firmware des AT32UC3B1256 auf dem MEGA1284P
XPLAINED müsste man rankommen, oder?
Alexander S. schrieb:> Zu mindestens an die Firmware des AT32UC3B1256 auf dem MEGA1284P> XPLAINED müsste man rankommen, oder?
Naja, über dessen Bootloader kannst du sie aktualisieren. Aber ob es
eine neuere dafür gibt, die auch ISP beinhaltet, wage ich zu bezweifeln.
Man wird das Teil dann nie wieder angefasst haben.
So toll eingeschlagen, wie man sich das erhofft hatte, ist der
ATmega1284P wohl sowieso nicht seinerzeit, und irgendwann ist er dann
von den Xmegas überholt worden.
Hallo,

noch ein Nachtrag zu EDBG µC. Falls sich wer sowas selbst bauen möchte.
Einfacher wäre sich ein kleines Microchip Curiosity Board zu nehmen und
den Programmer-Teil "abzubrechen".
Also, zumindestens für einen SAMD11 passend liegt hier das Programm
dafür. Für UPDI Programmierung und USB-Serial Wandler in einem. Ist vom
Nano Every Board.
https://github.com/arduino/ArduinoCore-megaavr/tree/master/firmwares/MuxTO
Hallo,

ich habe jetzt zwar den optiboot bootloader erfolgreich auf dem
MEGA1284P XPLAINED installiert und kann dann über USB scheinbar
erfolgreich das Demoprogramm zum MEGA1284P XPLAINED aufspielen:
delaying chip erase until first -U upload to flash
6
avrdude: reading input file mega_1284p_xplained_example.hex for flash
7
with 9022 bytes in 1 section within [0, 0x233d]
8
using 36 pages and 194 pad bytes
9
avrdude: preparing flash input for device bootloader
10
avrdude: writing 9022 bytes flash ...
11
12
Writing | ################################################## | 100% 101.60 s
13
14
avrdude: 9022 bytes of flash written
15
avrdude: verifying flash memory against mega_1284p_xplained_example.hex
16
17
Reading | ################################################## | 100% 101.60 s
18
19
avrdude: 9022 bytes of flash verified
20
21
avrdude done. Thank you.
Aber das Programm, d.h. der "Terminal Mode" mit minicom, funktioniert
nicht. Es funktioniert scheinbar nur wenn ich es mit Atmel ICE per ISP
programmiere.
Da du ein Atmel-ICE besitzt: schmeiß doch mal den Debugger an und schau
nach, wo es herum hängt. Möglicherweise bleibt der Bootloader ja aktiv
und startet das Programm nicht?

(Musst bei der Debug-Sitzung nur schauen, dass die nicht selbst alles
nochmal flasht.)
Du kannst den Debugger auch ohne -g benutzen, dann wurschtelst du dich
halt durch den Binärcode im Target durch. Du solltest aber zumindest
erkennen können, ob er noch im Bootloader hängt (hohe Adressen) oder
schon die eigentliche Applikation gestartet hat.
Jörg W. schrieb:> Du kannst den Debugger auch ohne -g benutzen,
Da im zip nur ein .hex ist, muss ich für den Debugger ja sowieso ein
.elf erzeugen. Dann kann ich auch gleich mit -g compilieren. Habe ich zu
mindestens gedacht. Aber leider sind im zip nicht alle Quelltexte
enthalten um mega_1284p_xplained_example.c zu kompilieren. Die Atmel
QTouch Lib fehlt.
AVR/m1284p-xpld-src/init.c:266: undefined reference to `qt_config_data'
4
AVR/m1284p-xpld-src/init.c:266: undefined reference to `qt_config_data'
5
init.o: In function `touch_init':
6
AVR/m1284p-xpld-src/init.c:284: undefined reference to `SNS_array'
7
AVR/m1284p-xpld-src/init.c:284: undefined reference to `SNS_array'
8
AVR/m1284p-xpld-src/init.c:284: undefined reference to `SNSK_array'
9
AVR/m1284p-xpld-src/init.c:284: undefined reference to `SNSK_array'
10
AVR/m1284p-xpld-src/init.c:284: undefined reference to `qt_enable_key'
11
AVR/m1284p-xpld-src/init.c:284: undefined reference to `calc_masks'
12
AVR/m1284p-xpld-src/init.c:284: undefined reference to `calc_masks'
13
AVR/m1284p-xpld-src/init.c:284: undefined reference to `burst_1_2_00_0'
14
AVR/m1284p-xpld-src/init.c:284: undefined reference to `burst_1_2_00_0'
15
AVR/m1284p-xpld-src/init.c:284: undefined reference to `qt_init_sensing_with_burst'
16
AVR/m1284p-xpld-src/init.c:284: undefined reference to `qt_filter_callback'
17
AVR/m1284p-xpld-src/init.c:284: undefined reference to `qt_filter_callback'
18
mega_1284p_xplained_example.o: In function `standby_cmd':
19
AVR/m1284p-xpld-src/mega_1284p_xplained_example.c:546: undefined reference to `qt_measure_sensors'
20
mega_1284p_xplained_example.o: In function `power_down_cmd':
21
AVR/m1284p-xpld-src/mega_1284p_xplained_example.c:535: undefined reference to `qt_measure_data'
22
collect2: error: ld returned 1 exit status
Die Lib finde ich nur als .vsix und die will ich eigentlich auch nicht
installieren. Alle Aufrufe der QTouch Lib auszukommentieren ist mir
ehrlich gesagt momentan auch zu aufwändig.

P.S. Ohne das Atmel Studio komme ich selbst mit dem .vsix ja nicht an
die C-Quelltexte, oder?
Alexander S. schrieb:> Alle Aufrufe der QTouch Lib auszukommentieren ist mir> ehrlich gesagt momentan auch zu aufwändig.
Ich habe jetzt doch damit begonnen. Scheinbar habe ich eine
Timer-Routine zu viel auskommentiert. Im Menuepunkt 5 verhält sich das
Terminalprogramm abweichend. Der Rest, bis auf QTouch, scheint aber,
nach Programmieren mit dem Atmel ICE, zu funktionieren.
Hallo,

vielleicht eine ganz doofe Frage. Optiboot lauscht auf der USART1. An
den Pins hast du keine weitere Hardware angeklemmt? Denn die würde dort
stören.
Alexander S. schrieb:> Da im zip nur ein .hex ist, muss ich für den Debugger ja sowieso ein> .elf erzeugen.
Musst du nicht. Prinzipiell sollte man einen Debugger auch ganz ohne
Objektdatei starten können, er hat ja schließlich den Flash des Targets,
den er auslesen kann. Klar, du hast dann keinerlei Symbole, nur Adressen
und einen Disassembler.
QTouch gibt es nicht als Sourcecode, solltest du aber trotzdem auch dazu
linken können. Dann hast du eben für den Touch-Teil keine
Debug-Informationen.
Alexander S. schrieb:> (gdb) target remote localhost:4242> Remote debugging using localhost:4242> 0x0001f000 in ?? ()
Das ist der Einsprungpunkt für den Bootloader.
> (gdb) list> 796 * This example code shows some of the basic features of the> 797 * MEGA-1284P Xplained kit. This includes sleep modes, reading the
Das zeigt dir natürlich nur erst einmal das main() deiner geladenen
Applikation.
> (gdb) next> Cannot find bounds of current function> (gdb) step> Cannot find bounds of current function
Klar, irgendwas in der Richtung geht nicht, denn das will auf
Sourcecode-Ebene arbeiten. stepi (kurz: si) geht aber. Dann noch ein
1
disp/i $pc
und du kannst mit deinen si-Kommandos zumindest verfolgen, wo er lang
wandert.

Irgendwann ein "c" (continue), dann kannst du später mit ^C anhalten und
schauen, wo er jetzt ist.
Veit D. schrieb:> Optiboot lauscht auf der USART1. An> den Pins hast du keine weitere Hardware angeklemmt?
Nein, angeschlossen ist nichts. Gleicher HW-Zustand wie in
Beitrag "Re: MEGA1284P XPLAINED über USB mit avrdudue programmieren"
Von fünf Versuchen mit optibbot hat der letzte keinen Fehler geliefert.
Ich starte avrdude sofort nach Reset.
Direkt nach dem Programmieren über USB mit optiboot haben die LEDs auf
dem Mega-1284p-xpld nach Loslassen von Taster SW1 nach Reset geblinkt.
D.h. sich so verhalten, wie nach dem Programmieren mit dem Atmel ICE.
Nach Reset blinken sie nicht mehr. Ist das Programm nach Reset jetzt
schon wieder weg?
Jörg W. schrieb:> Klar, irgendwas in der Richtung geht nicht, denn das will auf> Sourcecode-Ebene arbeiten. stepi (kurz: si) geht aber. Dann noch ein> disp/i $pc>> und du kannst mit deinen si-Kommandos zumindest verfolgen, wo er lang> wandert.>> Irgendwann ein "c" (continue), dann kannst du später mit ^C anhalten und> schauen, wo er jetzt ist.
Ich habe den optiboot bootloader jetzt wieder mit dem Atmel ICE mit dem
Demoprogramm überschrieben und avarice und gdb-avr gestartet. D.h. alles
ohne optiboot.
Naja, du hast die Fuses jetzt noch so stehen, dass der Bootloader aktiv
ist, nur keinen Bootloader mehr dort.
Alexander S. schrieb:> Aber die Frage war ja warum oder wo das Programm mit optiboot hängt.
Deshalb müsstest du sowohl optiboot als auch das eigentliche Program
drin haben und dann alles im Debugger starten.
Wenn du für optiboot und das Demo nur getrennte Lade-Dateien hast zum
Flashen, dann musst du sicherstellen, dass du beim zweiten Flashen nicht
alles vorher löschst.
Jörg W. schrieb:> Wenn du für optiboot und das Demo nur getrennte Lade-Dateien hast zum> Flashen, dann musst du sicherstellen, dass du beim zweiten Flashen nicht> alles vorher löschst.
Ich habe jetzt wieder den optiboot bootloader mit dem Atmel ICE in das
Mega1284p-xpld geschrieben. Beim Programmieren des Demoprogramms über
USB und per optiboot habe ich zusätzlich die avrdude Option -D (Disable
auto erase for flash memory) angegeben. Da hatte ich mich vorher schon
gefragt, ob die erforderlich ist.:
Nur die Ausführung des mit optiboot programmierten Demoprogramms im
Terminal Modus (SW 1 nach Reset loslassen) und Auswahl der
Menuefunktionen über minicom funktioniert immer noch nicht.
Wenn ich das Mega1284p-xpld aus- und wieder einstecke, blinken auch die
LEDs nicht mehr nach Loslassen von SW1. Aber das Programm ist doch auch
mit bootloader im Flash und sollte ohne Strom erhalten bleiben.
Hallo,

hast du jemals die Fuses richtig konfiguriert? Die bootsize Option ist
dafür kein Ersatz, falls du das annehmen solltest. Lies einmal die Fuse
aus und schau nach ob die BOOT Bits im High Byte korrekt gesetzt sind.
Oder prüf gleich alle nochmal. Weil ein Flash Erase vor
Neuprogrammierung ist eigentlich normal um keine Bit Leichen zu haben.

> avrdude -p m1284p -P /dev/ttyACM0 -b 57600 -c urclock -B 125kHz -v

Hiermit sollten die Fuses klar angezeigt werden. Das fehlt mir irgendwie
in deinen Ausgabetexten von avrdude.

a) Fuse korrekt einstellen
b) Bootloader flashen
c) Programmierung mittels USB
d) irgendwann wieder Programmer angeklemmt, ist b) und c) futsch

Der Bootloader hat laut meines Wissens ca. 1s Wartezeit nach Reset bevor
er das eigentliche Programm startet. Ich hatte gedacht/gehofft der
AT32UC3B1256 bekommt den Reset zur richtigen Zeit automatisch gebacken.
Veit D. schrieb:> hast du jemals die Fuses richtig konfiguriert? Die bootsize Option ist> dafür kein Ersatz, falls du das annehmen solltest. Lies einmal die Fuse> aus und schau nach ob die BOOT Bits im High Byte korrekt gesetzt sind.> Oder prüf gleich alle nochmal. Weil ein Flash Erase vor> Neuprogrammierung ist eigentlich normal um keine Bit Leichen zu haben.>>> avrdude -p m1284p -P /dev/ttyACM0 -b 57600 -c urclock -B 125kHz -v>> Hiermit sollten die Fuses klar angezeigt werden. Das fehlt mir irgendwie> in deinen Ausgabetexten von avrdude.
Hallo Veit,
ich habe das Mega1284p-xpld gebraucht gekauft und nichts an den Fuses
geändert. D.h. avrdude nur mit der Option -n oder -U flash:w:file.hex
aufgerufen. In meinen ersten Beiträgen hat avrdude die Fuses am Ende
ausgegeben. Hier nochmal die Ausgabe aus Beitrag
Beitrag "Re: MEGA1284P XPLAINED über USB mit avrdudue programmieren" vom 10.12.2023
17:57
Wenn ich das gleiche hex (das mit dem alten bootloader und Demo Programm
zum Mega1284p-xpld von Atmel) jetzt nochmal mit den gleichen Parametern
schreibe ist die Dateigröße anders, 9798 bytes ggü. 128192 bytes of
flash und die Zeile "safemode: Fuses OK (E:FF, H:9A, L:F7)" fehlt.
Wichtig dabei ist, dass ich zu Beginn avrdude: Version 6.3-20171130
verwendet habe und ab
Beitrag "Re: MEGA1284P XPLAINED über USB mit avrdudue programmieren" , 12.12.2023 21:29,
avrdude: Version 7.1. Hat sich da etwas an der Ausgabe der Fuse-Info
geändert? In der man-page steht
1
-s, -u These options used to control the obsolete "safemode" feature which is no longer present. They are silently ignored for backwards compatibility.
Wird die savemode Zeile ab avrdude 7.1 nicht mehr ausgegeben?
Alexander S. schrieb:> Wird die savemode Zeile ab avrdude 7.1 nicht mehr ausgegeben?
Ja, safemode haben wir entfernt. Das hatte seine beste Zeit schon 20
Jahre hinter sich gelassen. :-)
Der Hintergrund von safemode ist, dass in der Anfangszeit AVRs sehr
häufig mittels direktem Bit-Bang von einer parallelen Schnittstellen
(wer sie noch kennt ;-) vom PC aus programmiert worden sind. Adapter mit
eigenen Controllern, wie wir sie heute benutzen, waren damals teuer und
eher selten.
Wenn in so einem Aufbau jetzt die Verdrahtung etwas wackelig war, dann
konnten sich schnell mal Bitfehler in der Programmierung einschleichen.
Da ein Bitfehler in der Programmierung der Fuses unangenehme
Konsequenzen haben kann (wenn man sich versehentlich die Taktquelle für
die MCU abklemmt), wurde das safemode-Feature eingeführt, welches die
Fuses zu Anfang und Ende inklusive gewollter Änderungen vergleicht.
Mit heutigen Programmieradaptern braucht man sowas nicht mehr, das
Risiko von Fehlprogrammierung ist viel geringer als damals. Außerdem
haben nunmehr bei weitem nicht mehr alle AVRs ein Fuse-Schema wie "low,
high, extended".
Natürlich gäbe es trotzdem Wege, die Fuses explizit zu lesen und
anzeigen zu lassen, am einfachsten im Terminalmodus mit "r lf", "r hf",
"r ef".
Deine Fuses stehen auf full-swing crystal oscillator ohne Vorteiler,
maximale (also sehr konservative) Startverzögerung, kein Debugging aktiv
(wundert mich, da du ja den Debugger verwendet hast), Bootsize 2048
Worte (also ab 0x1F000 Byte-Adresse), Reset springt zum Bootloader.
Bei efuse und hfuse hattest du das Format vergessen, deshalb hast du
diese als raw binary bekommen.

> Das war mit der safemode Zeile einfacher.

Für die AVRs mit genau diesen drei Fuses.

Nur ehrlich: so oft braucht man das ohnehin nicht. Normalerweise stellt
man die Fuses einmal ein und dann isses gut.
Fällt Dir auch noch etwas zu ein:
Alexander S. schrieb:> Wenn ich das gleiche hex (das mit dem alten bootloader und Demo Programm> zum Mega1284p-xpld von Atmel) jetzt nochmal mit den gleichen Parametern> schreibe ist die Dateigröße anders, 9798 bytes ggü. 128192 bytes of> flash
1
$ ls -l mega_1284p_xplained_*.hex
2
-rw-r--r-- 1 a... a... 27656 Mar 28 2011 mega_1284p_xplained_bootloader_and_example.hex
3
-rw-r--r-- 1 a... a... 25402 Mar 29 2011 mega_1284p_xplained_example.hex
Moin,

ich arbeite zur Zeit an einem Firmeninternen 1284P Labor Projekt mit
"Mighty Core" Unterstützung, wo ein fest eingelöteter TQFP 1284P sitzt.
Anhand meiner Dokumentation ging ich wie folgend vor:

    Bootloader Installation:
    ------------------------------
    1) Connect ATMEL AVR-ISP via 6-pin standard pinout cable to
          JP5 with red stripe of cable
          matching the PIN-1 marking at the JP5 header
    2) Install and run ATMEL STUDIO V7.0
    3) Select Tools->Device Programmimg
    4) Select AVRISP mkII
    5) Set Device: ATmega1284P
    6) Press Interface Apply button
    7) Read Device Signature - should display "0x1E9705"
    8) Click on FUSES Tab
    9) Set Extended to "0xFF", High: "0xDC", Low: "0xD7
    10) Press Program Fuses Button
    11) Select Memories Tab
    12) Load Bootloader HEX file ("optiboot_atmega1284P")
    13) Press Program Button. If everything is OK, exit AS7

Vorausgesetzt ist ein 16MHz Quarz an den XTAL pins und STandard Arduino
Serial Interface Beschaltung mit DTR über C an RESET Eingang

Vielleicht hilft es Dir. Diese Angaben sind absolut zuverlaessig.
(Ich arbeite mit "MightyCore". Auch der Bootloader stammt von dort)

Gerhard

Zusaetzliche Notizen:

Mighty Core: https://github.com/MCUdude/MightyCore

    IDE Settings:

    Note: Do not power board with AC power supply yet

    1) Start and load Arduino IDE 1.8.19 or newer and this program
    2) Go to tools and set correct COM port for connected USB-Serial
Adapter, e.g. "COM5"
       (This will likely be different for your PC)
    3) Connect 6-pin Serial cable to JP1 (5V/12V LED LD5 should come on)
    4) Make sure you have installed bevorehand the Mighty Core
ATMEGA1284P package
    5) Select Board: Mighty Core: ATMEGA1284P
    6) Select Clock: External 16MHz Crystal
    7) Bod: 2.7V
    8) EEPROM retained
    9) Compiler LTO disabled
    10) Variant: 1284P
    11) Pinout: STD Pinout
    12) Bootloader: YES USART0 selected
    13) Port: As selected by Windows - Verify
    14) Try to download this program by pressing the "->" Button
        - The Blue LED should light up when the USB Serial interface is
active
        - AVRdude will now try to serially download the HEX code to the
SVX board
          The RXD0 and TXD0 LEDS should be flashing actively as the code
is being
          transferred to the board
    15) Go to Tools and Select "Serial Monitor" and set it to 9600Bd and
"Both NL & CR"
    Serial Monitor should now show after a few seconds:
    ---------------------------------------------------
    Reading EEPROM defaults
    SVX V1 STARTUP OK
    ---------------------------------------------------
Alexander S. schrieb:> Fällt Dir auch noch etwas zu ein:
Naja, die Ausgabe ist nicht korrekt. Es wird da nicht wirklich
dokumentiert, wie viele Bytes beschrieben worden sind, sondern die
Differenz zwischen der letzten und der ersten Adresse ausgerechnet. Da
der Bootloader weit oben ist, bekommst du eine sehr große Zahl.
Jörg W. schrieb:> Naja, die Ausgabe ist nicht korrekt. Es wird da nicht wirklich> dokumentiert, wie viele Bytes beschrieben worden sind, sondern die> Differenz zwischen der letzten und der ersten Adresse ausgerechnet. Da> der Bootloader weit oben ist, bekommst du eine sehr große Zahl.
Im ersten Fall (128192 bytes of flash) war ja vermutlich der "originale"
bootloader aus dem Demoprogramm zum Mega1284p-xpld aus der hex-Datei
mega_1284p_xplained_bootloader_and_example.hex darauf.
Im zweiten Fall (9798 bytes of flash) hatte ich inzwischen den kleineren
optiboot bootloader geflashed. Ich hätte gedacht, dass nach
alles wieder so ist wie vorher. D.h. keine Spuren mehr vom optiboot
bootloader vorhanden sind. Gibt es eine Quelle wo die Besonderheiten mit
bootloader kurz und prägnant beschrieben werden?
Gerhard O. schrieb:> Vorausgesetzt ist ein 16MHz Quarz an den XTAL pins und STandard Arduino> Serial Interface Beschaltung mit DTR über C an RESET Eingang
Danke Gerhard für Deine Hinweise. Die Beschaltung auf dem
Mega_1284P_Xplained_Board scheint aber gerade nicht der "Standard
Arduino Serial Interface Beschaltung" zu entsprechen. Siehe
https://www.mikrocontroller.net/attachment/617964/MEGA_1284P_Xplained_Schematic.pdf
Alexander S. schrieb:> avrdude: reading lfuse memory ...> avrdude: writing output file <stdout>> 0xf7> avrdude: reading hfuse memory ...> avrdude: writing output file <stdout>> 0x1a> avrdude: reading efuse memory ...> avrdude: writing output file <stdout>> 0xff
Warum sind die Fuses jetzt low F7, high 1A, ext FF? Am 12.12.23 waren
sie noch low F7, high 9A, ext FF.
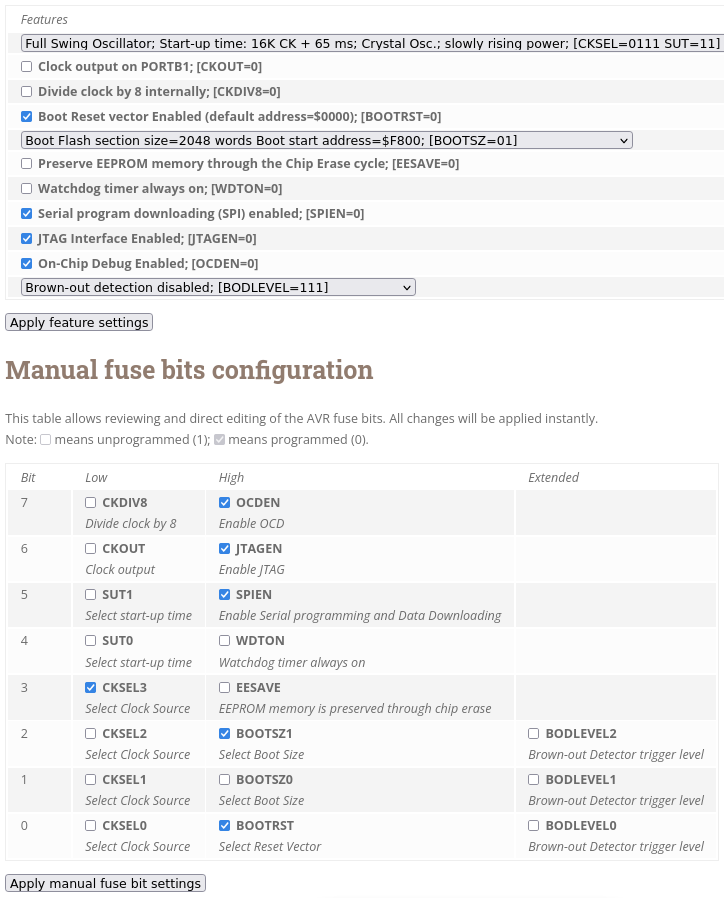
Alexander S. schrieb:> avrdude: safemode: Fuses OK (E:FF, H:9A, L:F7)
Wie bereits geschrieben habe ich nie explizit avrdude -U hfuse:w:...
aufgerufen.
Im Anhang die Ausgaben vom fusecalculator.
Der Unterschied ist aber "nur", dass jetzt mit high 1A auch On-Chip
Debug und OCDEN enabled sind. Kommt das durch die Nutzung von avarice
und gdb?
Alexander S. schrieb:> Kommt das durch die Nutzung von avarice> und gdb?Jörg W. schrieb:> kein Debugging aktiv> (wundert mich, da du ja den Debugger verwendet hast),
Ist bzw. war wohl die Antwort.
Alexander S. schrieb:> Gerhard O. schrieb:>> Vorausgesetzt ist ein 16MHz Quarz an den XTAL pins und STandard Arduino>> Serial Interface Beschaltung mit DTR über C an RESET Eingang>> Danke Gerhard für Deine Hinweise. Die Beschaltung auf dem> Mega_1284P_Xplained_Board scheint aber gerade nicht der "Standard> Arduino Serial Interface Beschaltung" zu entsprechen. Siehe> https://www.mikrocontroller.net/attachment/617964/MEGA_1284P_Xplained_Schematic.pdf
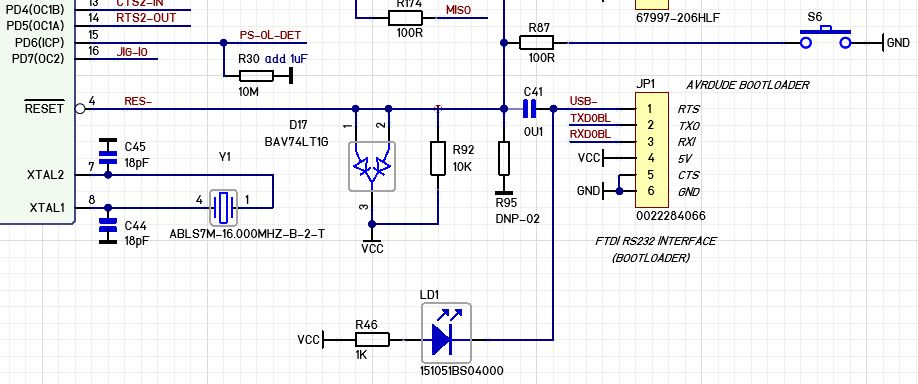
Hallo Alexander,
das ist richtig. Fuer mich ist das aber meine eigene (Universal)
Umsetzung. D17 hat den Zweck den RESET Eingang vom C41 Überschwinger
beim Zurückschalten L->H zu schützen, weil ja dann die gespeicherte
Ladung von C41 zur VDD addiert wird und den CMOS Eingang momentan auf
Vcc+C41 Spannung aussetzt. R95 ist hier aber nicht notwendig. Bei den
ATMEGA328PB ist der allerdings notwendig, weil der RESET Threshold
Bereich schmaler ist und der RESET Eingang bei 3.3V USB Serial Adaptern
nicht zuverlässig funktioniert (Siehe auch Watterott Kommentare dazu).
Der 6-Pin JP1 Header folgt dem der Arduino Pro-Mini Boards und
funktioniert mit passenden handelsüblichen USB Serial Adaptern. Es
funktioniert alles bei mir einwandfrei. R87 und S6 ist ein Bord RESET
Taster.
Die ICSP Beschaltung ist bei mir der Atmel Standard 2x3 Header, passend
zu ATMEL AVR-ISP MKII. USB- ist bei mir gebraucht um den USART0 Port
umzuschalten, weil der sonst andersweitig verwendet wird und das wird
durch die blaue LD1 angezeigt, wenn der BL aktiv ist. Normalerweise ist
USART0 an einer anderen Schnittstelle angeschlossen. Ist aber extern
unwichtig zu wissen;-)
Gerhard
Veit D. schrieb:> Hallo,>> hast du jemals die Fuses richtig konfiguriert? Die bootsize Option ist> dafür kein Ersatz, falls du das annehmen solltest. Lies einmal die Fuse> aus und schau nach ob die BOOT Bits im High Byte korrekt gesetzt sind.> Oder prüf gleich alle nochmal.
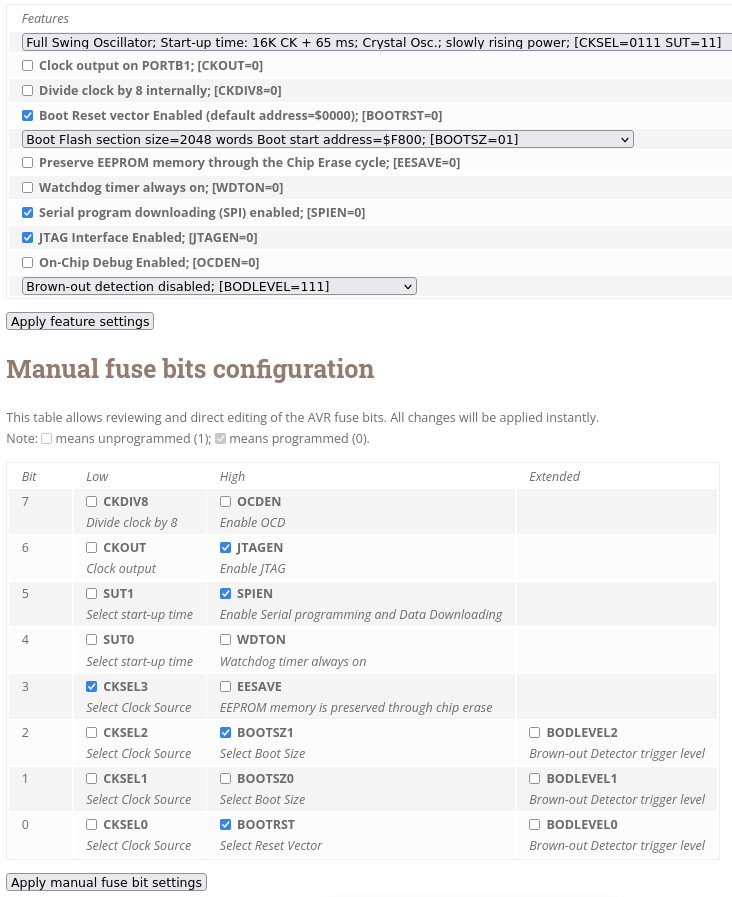
Hallo Veit,
mit
"Boot reset vector enabled (default address=$0000); [BOOTRST=0]"
"Boot flash section size = 2048 words Boot start address=$F800;
[BOOTSZ=01]"
Fuse: High / Mask: 0x06
d.h. BOOTSZ1 und BOOTRST enabled.
sollte es doch passen, oder?
Jörg W. schrieb:> Bootsize 2048> Worte (also ab 0x1F000 Byte-Adresse), Reset springt zum Bootloader.
Hallo,

wenn ich einmal eine Anregung geben darf. Die Fusezeile fand ich schon
praktisch. Zudem die fuses, signatur usw. Angaben in der Tabelle darüber
noch nie gestimmt haben. Stehen immer auf 0? Warum hat man die Tabelle
nicht korrigiert oder eingekürzt?
Die Fuse Angaben könnte man doch eigentlich Controllerabhängig
gestalten.
Alte Controller mit low/high/ext Fuse. Neue mit fuse0...9 oder wie lang
auch immer. Meinetwegen zum auslesen mit einem readFuse Kommando, sodass
man nicht alles einzeln abfragen muss. Das wäre eine sichtbare
Verbesserung.  :-)

Übrigens, ich bekomme keine Wertausgabe zu Gesicht mit bspw.
avrdude -c avrispmkII -p m2560 -v -U lf:r:-:h
obwohl es gemeldet wird
avrdude: processing -U hf:r:-:h
avrdude: reading hfuse memory ...
avrdude: writing output file <stdout>
Veit D. schrieb:> Übrigens, ich bekomme keine Wertausgabe zu Gesicht mit bspw.> avrdude -c avrispmkII -p m2560 -v -U lf:r:-:h> obwohl es gemeldet wird> avrdude: processing -U hf:r:-:h
Warum wird bei "avrdude -U lf:r:-:h" "-U hf:r:-:h" prozessiert? :-)
Hallo,

> BOOTSZ1 und BOOTRST enabled
passt. Der Opti-Bootloader ist 384 Bytes groß. Ein Word sind 2 Byte,
passt in 512 Words BootSize locker rein. Man bräuchte demnach auch kein
BootSize Bit "setzen". Passt noch in 256 Word rein. Größere BootSize
stört aber praktisch nicht, außer man benötigt noch paar Bytes Flash.

Ich weiß nicht was schief läuft.

Edit 2:
was vorhin hier stand war falsch, hatte im Manual die falsche Tabelle
erwischt. Also BootSize Einstellung 2048 Words und Start Adresse 0xF800,
die Aussagen passen zusammen. Egal, die Fuse muss stimmen.
Hallo,

ich werde die Versuche einen funktionierenden Bootloader auf dem
Mega-1284p-XPLD zu installieren vorerst beenden und mich stattdessen dem
Programmieren des Mega-1284p-XPLD widmen. Da ich ab und zu zw. zwei
Wohnungen pendle, wäre es ganz praktisch gewesen, nur das
Mega-1284p-XPLD und ein USB-Kabel und nicht auch noch einen Atmel ICE
oder AVR ISP mkII mitnehmen zu müssen. Aber so groß und schwer sind die
ja nun auch nicht.

Ich habe jetzt die Fuses auf low 0xF7, high 0x1F, ext 0xFF, d.h. keinen
BOOTRST und Boot Flash Section Size 512 gesetzt. Dann habe ich in dem
Demoprogramm zum Mega-1284p-XPLD nur das nötigste der QTouch-Routinen
auskommentiert, damit ich zu allen Funktionen den Quelltext habe. Dann
neu kompiliert. Das hex habe ich mit dem Atmel ICE in den Mega1284p
geschrieben: